QUASI COLD AIR INTAKE
I call this a quasi cold air intake since the filter under the hood is not fully insulated, but this was a test of my cold air solution to see how it works. I will most likely pick up a filter that is enclosed on the sides but open on both ends, that way the only air that is sucked in is from the direct front of the filter. I can attach a hose to it and run the hose out the stock opening in the grill area.
 The
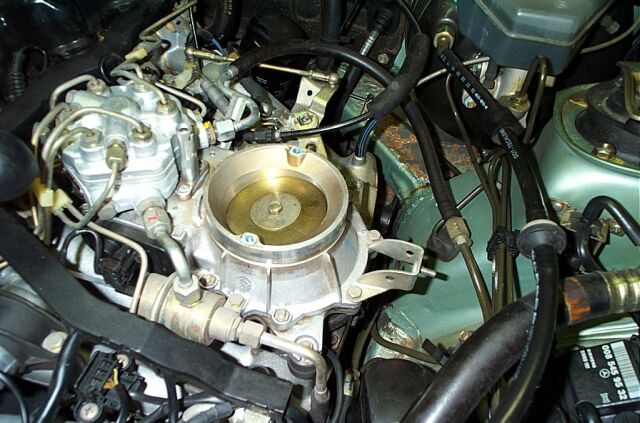
201 and 124 chassis cars are not the easiest to do air intakes on, the TB
has a 4" diameter opening and faces up, which means you need a reducer to
bring the 4" opening down to about 3" and some sort of piping that has a
sharp 90 degree bend. This picture shows the stock air intake system
(and a dirty engine compartment)
The
201 and 124 chassis cars are not the easiest to do air intakes on, the TB
has a 4" diameter opening and faces up, which means you need a reducer to
bring the 4" opening down to about 3" and some sort of piping that has a
sharp 90 degree bend. This picture shows the stock air intake system
(and a dirty engine compartment)For a experiment, I used ducting and a air filter left over from my C36 air intake, but I needed
 a
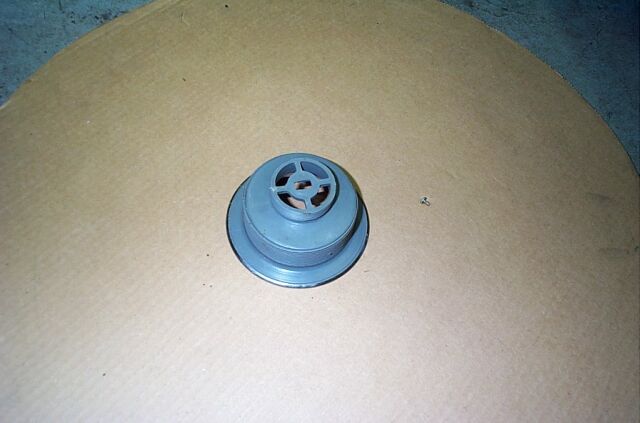
reducer that would work. This is where things get a
a
reducer that would work. This is where things get a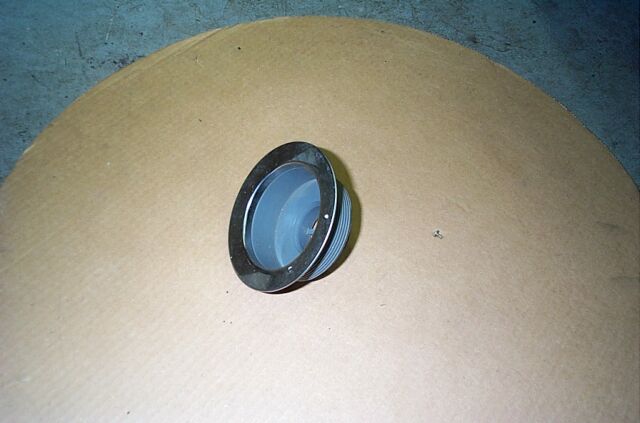 little funny,
err clever, something like that. The item pictured here is a sink
drain adapter, the kind you get when you purchase a sink garbage disposal,
its about 4" across and tapers to about 3" and has a threaded bottom on it
for attachment of the garbage disposal. This drain adapter fit onto
the TB exactly and has a reinforced metal & plastic lip on it.
little funny,
err clever, something like that. The item pictured here is a sink
drain adapter, the kind you get when you purchase a sink garbage disposal,
its about 4" across and tapers to about 3" and has a threaded bottom on it
for attachment of the garbage disposal. This drain adapter fit onto
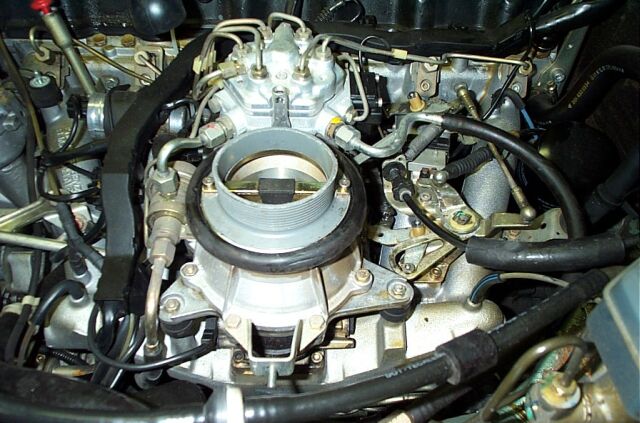
the TB exactly and has a reinforced metal & plastic lip on it.So to start, I had to cut the end off, file down the edges and drill two holes to mount the drain adapter to the TB. You need to remove the TB stop piece which is held on by two torx screws. I would not recommend leaving this item off, you definitely want to keep it, but integrating it with the drain adapter is not very simple, you can not just bolt the drain adapter over the TB stop, that would leave a large gap between the drain adapter and the TB, so I chose to cut notches into the drain adapter and insert the TB stop directly into the drain adapter, it allowed me to keep the stop intact and use it and the stock torx screws to hold the drain adapter tight against the top of the TB. I pulled the rubber gasket off the back of the stock air intake and used this as a gasket around the drain adapter and TB. I used a dremel with a cutting wheel and also a tile cutting bit which also allows you to drill holes and cut side ways, nice item to have around.


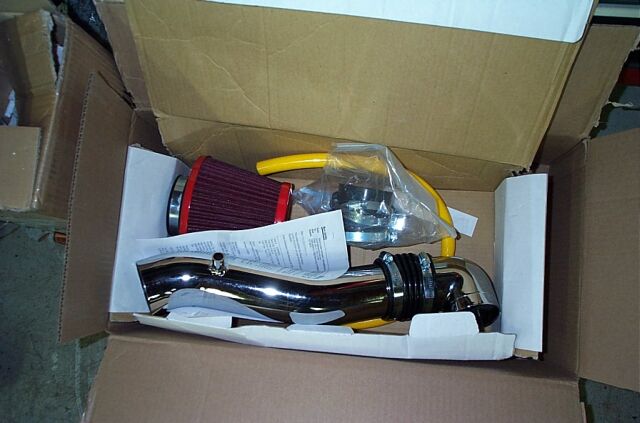 After
taking careful measurements of the available space in the 190E's engine
compartment, I concluded that this OBX air intake designed for the Ford
Focus would be the ideal kit to start with. Not many air intake
systems have a small right angle tube included and to top it off, this
right angle piece had a accordion type connector that would allow for some
more adjustability. I purchased this kit from Ebay for about $82
dollars and it came with the heat shielded OBX filter (not shown in this
picture)
After
taking careful measurements of the available space in the 190E's engine
compartment, I concluded that this OBX air intake designed for the Ford
Focus would be the ideal kit to start with. Not many air intake
systems have a small right angle tube included and to top it off, this
right angle piece had a accordion type connector that would allow for some
more adjustability. I purchased this kit from Ebay for about $82
dollars and it came with the heat shielded OBX filter (not shown in this
picture)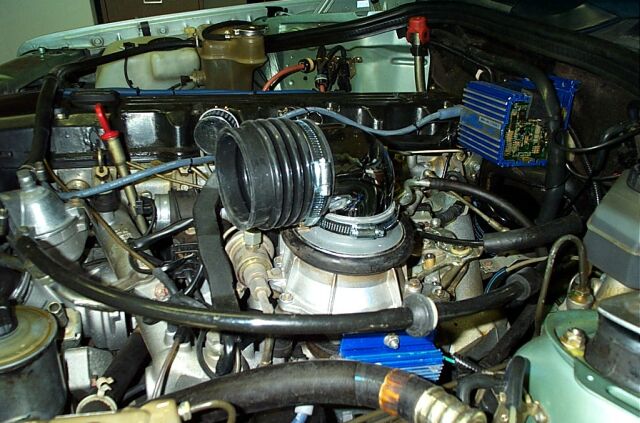 Here you can
see the small right angle tube with accordion connector. I could not
use a rubber coupler as it raised the right angle piece up too high, so I
needed to trim my 4" to 3" reducer and trim the bottom off the right angle
piece to drop the height. Although I don't like inserting this
aluminum right angle piece directly into my 4" to 3" plastic adapter (I am
afraid that this piece will get brittle with age and break apart) I had no
choice if I wanted the air intake to clear the hood.
Here you can
see the small right angle tube with accordion connector. I could not
use a rubber coupler as it raised the right angle piece up too high, so I
needed to trim my 4" to 3" reducer and trim the bottom off the right angle
piece to drop the height. Although I don't like inserting this
aluminum right angle piece directly into my 4" to 3" plastic adapter (I am
afraid that this piece will get brittle with age and break apart) I had no
choice if I wanted the air intake to clear the hood.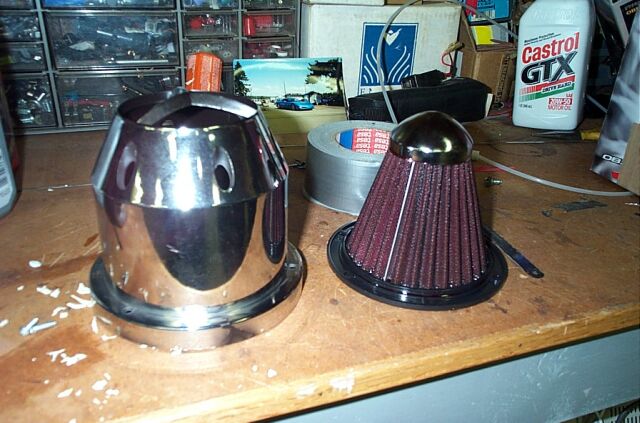 This is the
optional OBX head shielded air filter that came with the kit I purchased
off of Ebay, the heat shield is removable for servicing of the filter and
only the end is open to draw in air. This is a nice choice if you
can not locate your filter outside the engine compartment or if you can't
use a leader hose to bring cool air up from the bumper area.
This is the
optional OBX head shielded air filter that came with the kit I purchased
off of Ebay, the heat shield is removable for servicing of the filter and
only the end is open to draw in air. This is a nice choice if you
can not locate your filter outside the engine compartment or if you can't
use a leader hose to bring cool air up from the bumper area. This is the air
filter with the head shield in place. Three screws hold the assembly
together. The shield is chrome plated plastic, although rather
cheesy, it gets the job done.
This is the air
filter with the head shield in place. Three screws hold the assembly
together. The shield is chrome plated plastic, although rather
cheesy, it gets the job done. The longer
length of tube kind of angles down, which was another excellent feature.
This allows the filter to sit lower in the engine compartment closer to
the grill opening where it draws in cool air. I removed the OE air
scoop, and the opening is much larger and flows more air. The open
end of the air filter is almost directly facing this opening, so the
chances of it sucking up hot air has been greatly minimized. Also,
the long length of aluminum tube needed to have several inches cut off of
both ends. You need to be carefully how much you cut at each end, as
there is a flange in the middle that you connect a hose to that serves are
your valve cover breather, and you want this flange located close to the
middle so your hose will reach the valve cover. OBX includes a
yellow valve cover breather hose, but I used black hose as the yellow was
ugly. One last thing to note, the air temp sensor was placed at the
opening of the air filter and is held in place with a wire tire, its
important you keep this item shielded from heat and in the direct path of
cool air going into the air filter.
The longer
length of tube kind of angles down, which was another excellent feature.
This allows the filter to sit lower in the engine compartment closer to
the grill opening where it draws in cool air. I removed the OE air
scoop, and the opening is much larger and flows more air. The open
end of the air filter is almost directly facing this opening, so the
chances of it sucking up hot air has been greatly minimized. Also,
the long length of aluminum tube needed to have several inches cut off of
both ends. You need to be carefully how much you cut at each end, as
there is a flange in the middle that you connect a hose to that serves are
your valve cover breather, and you want this flange located close to the
middle so your hose will reach the valve cover. OBX includes a
yellow valve cover breather hose, but I used black hose as the yellow was
ugly. One last thing to note, the air temp sensor was placed at the
opening of the air filter and is held in place with a wire tire, its
important you keep this item shielded from heat and in the direct path of
cool air going into the air filter. From this angle
you can see the valve cover breather hose and how it routes to the valve
cover. There is also a small clear vacuum hose that must also draw
vacuum from this hose. I punched a small hole in the hose and fed
the clear vacuum hose into the valve cover breather hose. Its not
too visible in the picture, but its right next to the valve cover. The performance increase was noticeable via my "seat of the pants"
meter and was a very worth wile modification
From this angle
you can see the valve cover breather hose and how it routes to the valve
cover. There is also a small clear vacuum hose that must also draw
vacuum from this hose. I punched a small hole in the hose and fed
the clear vacuum hose into the valve cover breather hose. Its not
too visible in the picture, but its right next to the valve cover. The performance increase was noticeable via my "seat of the pants"
meter and was a very worth wile modification