AUDIO
The next step with this car was to upgrade the factory sound system.
My days of high end IASCA systems are over but being in search of sonic
ecstasy in the automobile is still a hobby. In 1992 the factory
sound system was upgraded a bit and instead of the factory head unit being
made by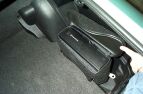 Becker its made by Alpine. This made locating a factory CD
changer a bit more
challenging, but I did manage to locate one on EBay that was new, came
with the cover and all necessary cables. Only thing it did not come
with was the mounting bracket, so I had to fabricate some myself.
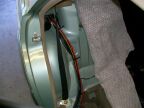
The MB cars are pre-wired from the factory with the CD changer cables and
power cables. In the case of the 190, the cables are located on the
passenger side of the trunk behind the plastic cover near the tail lights.
This install was very simple: mount the changer, plug in the cables
and were done. I installed the changer in the factory location that
still leaves the small storage compartment usable.
Becker its made by Alpine. This made locating a factory CD
changer a bit more
challenging, but I did manage to locate one on EBay that was new, came
with the cover and all necessary cables. Only thing it did not come
with was the mounting bracket, so I had to fabricate some myself.
The MB cars are pre-wired from the factory with the CD changer cables and
power cables. In the case of the 190, the cables are located on the
passenger side of the trunk behind the plastic cover near the tail lights.
This install was very simple: mount the changer, plug in the cables
and were done. I installed the changer in the factory location that
still leaves the small storage compartment usable.
Two of the factory speakers were blown and after further investigation,
the right channel of the factory Alpine head unit was also blown. So
after a quick search of Ebay, I located another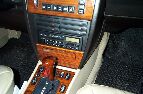 factory head out of a 93 190 and picked it up for about $60. I don't
really have step by step instructions for removing the head, but you need
to remove the ashtray and then the two screws hidden behind it.
After that, the Zebrano trim panel pulls out. The head unit is held
in place by two tabs underneath, so if you use a small flat blade screw
driver, you can bend them down (be careful, they are plastic and you don't
want to break them) to slide the head unit out). Anyway, after
installing the new unit, I realized that now only the right output on my
old deck was blown but the left side had a reduced output as well.
So, now I had a new fully functional head unit.
factory head out of a 93 190 and picked it up for about $60. I don't
really have step by step instructions for removing the head, but you need
to remove the ashtray and then the two screws hidden behind it.
After that, the Zebrano trim panel pulls out. The head unit is held
in place by two tabs underneath, so if you use a small flat blade screw
driver, you can bend them down (be careful, they are plastic and you don't
want to break them) to slide the head unit out). Anyway, after
installing the new unit, I realized that now only the right output on my
old deck was blown but the left side had a reduced output as well.
So, now I had a new fully functional head unit.
Ok, next up were the speakers. We all know the factory speaks blow, and to
top it off, two of mine were blown (literally). The factory dash
speakers are 4" so after careful study of the available options and a few
stops at local audio retailers, I elected to pick up a set of
Infinity 42.3I off of Ebay (specifically
www.ikesound.com ) for about $76 dollars shipped. These were by
far the best sounding 4" co-ax I listened to. I used the passive
crossovers that came with the speakers but I added a 100 uf cap inline to
eliminate frequencies below 200 Hz (6 db roll off). You don't want
any bass coming from these speakers.
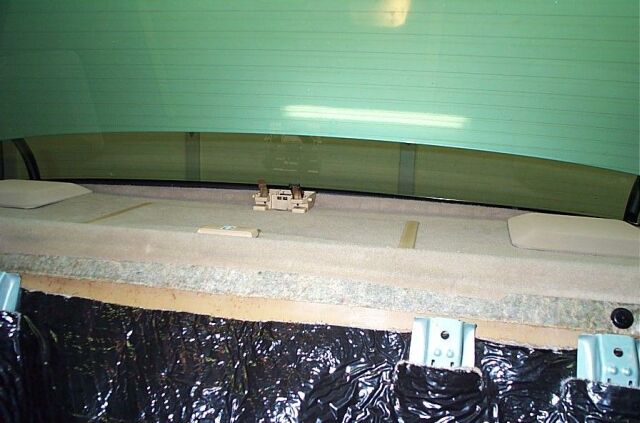
 On to the rear! The newer 190's had a 5.25" speaker mounted in the
rear deck. The speaker
is mounted in a plastic ABS housing that can be easily removed and
modified to hold a aftermarket 5.25" co-ax. I planned on picking up
a set of Infinity 52.3i 5.25" but I had a set of Infinity separates
sitting around and decided to use them. Although things did not go
as planned ( the tweeters would not fit under the factory grills, so
now they are sitting out on the rear deck) at some point, I will replace
them.
On to the rear! The newer 190's had a 5.25" speaker mounted in the
rear deck. The speaker
is mounted in a plastic ABS housing that can be easily removed and
modified to hold a aftermarket 5.25" co-ax. I planned on picking up
a set of Infinity 52.3i 5.25" but I had a set of Infinity separates
sitting around and decided to use them. Although things did not go
as planned ( the tweeters would not fit under the factory grills, so
now they are sitting out on the rear deck) at some point, I will replace
them.
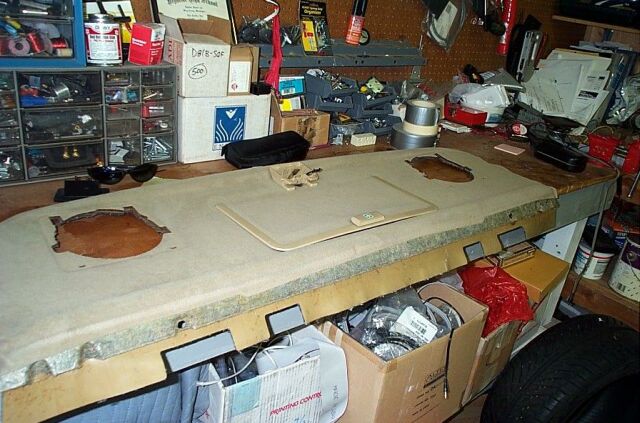
The grills can be removed by pushing them towards the rear window and
lifting up, then you pull them forward. Pretty simple. To get
the factory speaker pods out, there are two tabs that you
need to push in, then these pods will come right out. You need to
have a dremel or some other similar tool to trim the pod to accommodate a
different speaker. I also used a silicone to secure the speaker in
place and prevent any leaks. I also used the factory crossovers and
installed a 100 uf capacitor inline to filter out frequencies below 200
Hz. Since a single inline cap only provides a 6 db roll off,
the overall tonal balance is very good.
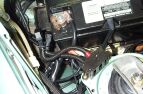
Next I had to investigate the woofers mounted in the doors to see if these
could be used to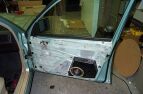 provide bass for the system (the system really needed it
now). The active bass system in these cars is powered by a separate
amplifier mounted in the trunk. Not sure of the power
provide bass for the system (the system really needed it
now). The active bass system in these cars is powered by a separate
amplifier mounted in the trunk. Not sure of the power
 output,
but it does have an internal crossover and only sends frequencies below
about 80 Hz to the door speakers. These speakers are housed in ABS
enclosures and will not accept anything larger than a 4" woofer without
serious modification. Given that fact and the fact that even if I
could fit a 8" woofer in there, the internal volume of the enclosure is
not enough for anything larger than say a 5.25" woofer. So, I
scrapped that idea altogether and just disconnected them. In my 300E
I installed a bandpass enclosure and routed the ports up through the rear
deck. I started looking at this type of solution for the 190, but
the trunk is much smaller than the 300 and I did not want to give up that
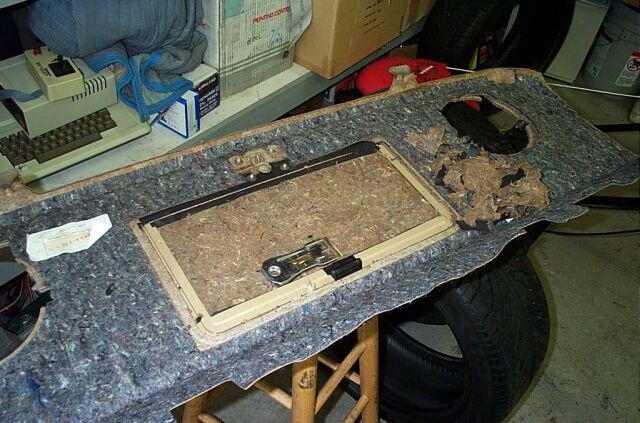
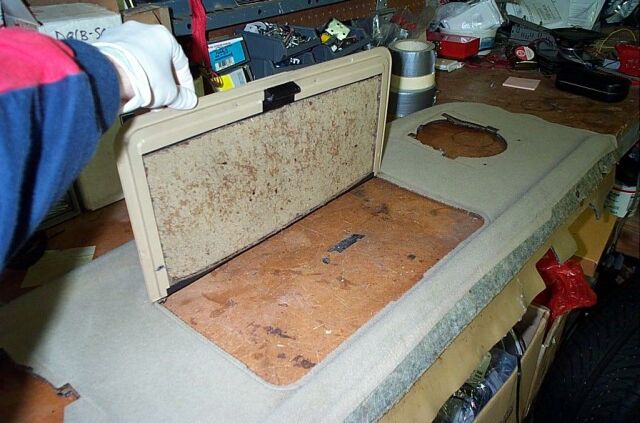
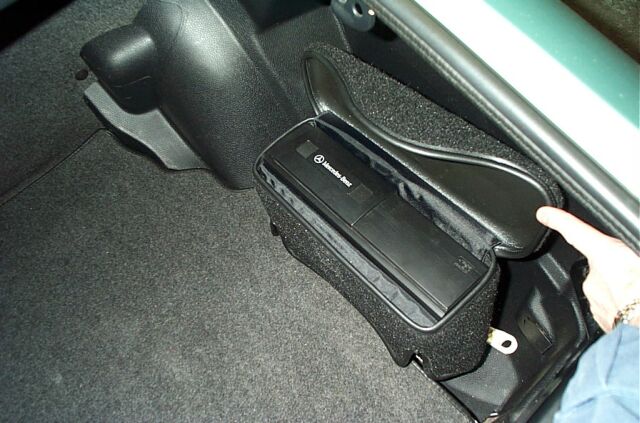
much trunk space. One thing nice on the 190 is that the first aid
kit sits in a plastic tray that can easily be removed. Ok, now I
figured out how to get the
output,
but it does have an internal crossover and only sends frequencies below
about 80 Hz to the door speakers. These speakers are housed in ABS
enclosures and will not accept anything larger than a 4" woofer without
serious modification. Given that fact and the fact that even if I
could fit a 8" woofer in there, the internal volume of the enclosure is
not enough for anything larger than say a 5.25" woofer. So, I
scrapped that idea altogether and just disconnected them. In my 300E
I installed a bandpass enclosure and routed the ports up through the rear
deck. I started looking at this type of solution for the 190, but
the trunk is much smaller than the 300 and I did not want to give up that
much trunk space. One thing nice on the 190 is that the first aid
kit sits in a plastic tray that can easily be removed. Ok, now I
figured out how to get the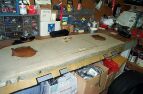 bass into the cabin of the 190, but I still did not have a good solution.
I thought about a infinite baffle design with maybe a 8" or 10" sub, but I
really don't like going that route unless I have a sub utilization a
active servo control, something to control the excursion. Well, back
to the
bass into the cabin of the 190, but I still did not have a good solution.
I thought about a infinite baffle design with maybe a 8" or 10" sub, but I
really don't like going that route unless I have a sub utilization a
active servo control, something to control the excursion. Well, back
to the
 search, after a few
more days I came across another product by Infinity called the Basslink.
It is a complete solution with 10" sub, 10" passive radiator, internal 200
watt amplifier that accepts high level inputs and is housed in a compact,
light ABS housing. The Basslink also has numerous adjustments for
tailing the sound, an adjustable crossover, phase control and Infinity's
version of active servo. This sounded rather interesting so after
visiting a few local audio shops again, I finally managed to get a listen.
This little cabinet had quite a impressive output, very tight and
detailed. It packed quite a punch for so small a cabinet. I
took some measurements and found that it would fit almost
search, after a few
more days I came across another product by Infinity called the Basslink.
It is a complete solution with 10" sub, 10" passive radiator, internal 200
watt amplifier that accepts high level inputs and is housed in a compact,
light ABS housing. The Basslink also has numerous adjustments for
tailing the sound, an adjustable crossover, phase control and Infinity's
version of active servo. This sounded rather interesting so after
visiting a few local audio shops again, I finally managed to get a listen.
This little cabinet had quite a impressive output, very tight and
detailed. It packed quite a punch for so small a cabinet. I
took some measurements and found that it would fit almost perfectly under the rear deck and not go all the way down to the floor of
the trunk, thus allowing me to carry larger cargo by sliding it under the
Basslink! Of course I was not going to buy this for $450 plus tax at
my local Car Toys, so back to
www.ikesound.com and picked up a new one for $234 shipped to my
door. (I love internet commerce!)
perfectly under the rear deck and not go all the way down to the floor of
the trunk, thus allowing me to carry larger cargo by sliding it under the
Basslink! Of course I was not going to buy this for $450 plus tax at
my local Car Toys, so back to
www.ikesound.com and picked up a new one for $234 shipped to my
door. (I love internet commerce!)
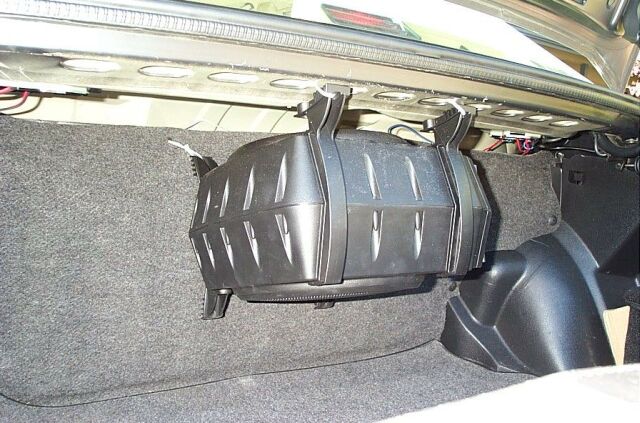
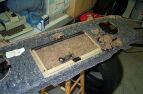
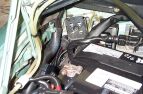
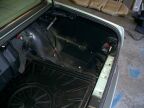
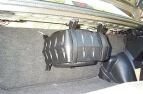 The installation of the Basslink was not complicated, as you can see I
mounted it directly under the first aid kit cut out and I used heavy duty
tie wraps to secure it to the underside of the rear deck and the gas
tank. It is secure and does not move. To help facilitate the
sound getting into the passenger compartment, I removed the rear deck and
carefully cut out the cardboard/jute material on the back of the first aid
kit door. Leaving only the carpet, I now had a acoustically
transparent door that looks completely stock.
The installation of the Basslink was not complicated, as you can see I
mounted it directly under the first aid kit cut out and I used heavy duty
tie wraps to secure it to the underside of the rear deck and the gas
tank. It is secure and does not move. To help facilitate the
sound getting into the passenger compartment, I removed the rear deck and
carefully cut out the cardboard/jute material on the back of the first aid
kit door. Leaving only the carpet, I now had a acoustically
transparent door that looks completely stock.
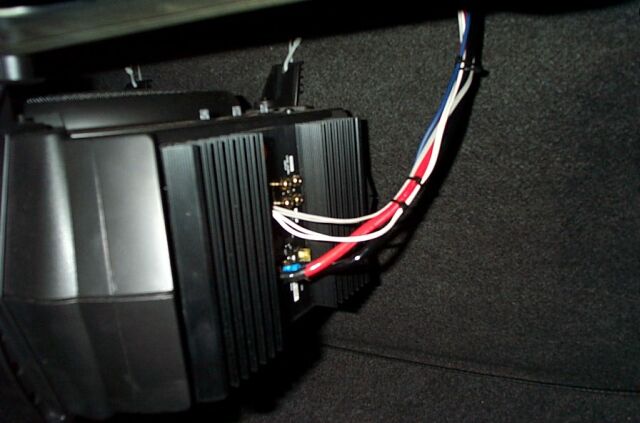
Signals for the Basslink are provided by the rear speakers (high level
inputs) since there are no low level signals available. Using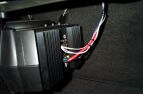 high
level signal inputs allows the Basslink to turn on
automatically when it detects a signal. While this was a novel idea,
it just did not work well, the turn on delay was long and the turn off
delay was also. When turning the system off, I was getting strange
sounds coming out of the Basslink and of course, turn on thumps. So
fortunately this option can be turned off and you can use a regular +12
turn-on lead to turn the Basslink on. I tapped into the door speaker
amplifier +12 turn-on lead and routed it over to the Basslink.
high
level signal inputs allows the Basslink to turn on
automatically when it detects a signal. While this was a novel idea,
it just did not work well, the turn on delay was long and the turn off
delay was also. When turning the system off, I was getting strange
sounds coming out of the Basslink and of course, turn on thumps. So
fortunately this option can be turned off and you can use a regular +12
turn-on lead to turn the Basslink on. I tapped into the door speaker
amplifier +12 turn-on lead and routed it over to the Basslink.
Ground was provided by a bolt next to the factory door speaker amplifier.
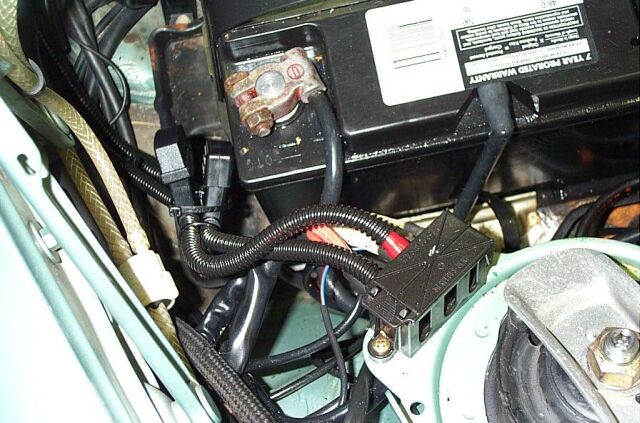
+12 power was run
 directly from the
battery and I picked up a Monster Cable power kit from a local shop for
$25. It has about 20 feet of 8 gage power, 4 feet of 8 gage ground,
20 feet of 16 gage turn on wire, a inline 30 amp fuse, ring connectors,
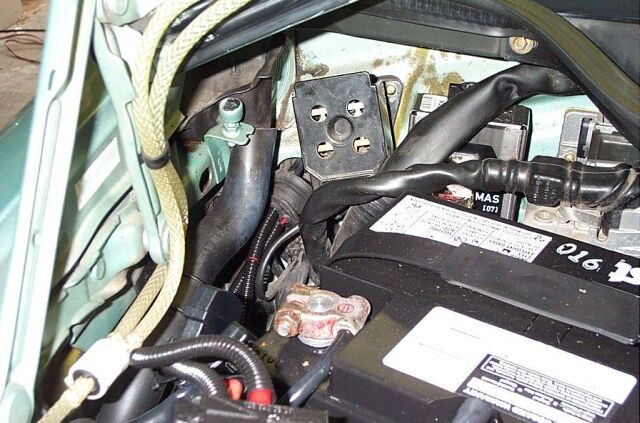
wire ties etc. I attached the +12 power to the power junction box
located next to the battery, in my pictures here, you see two fuse
holders, one for the Basslink and one for my Valentine 1. You can
see
the grommet in the firewall where I ran the power cable through, you need
to remove the plastic cover from behind the battery to gain access to this
grommet. Ran the power wire down the passenger side foot well and up
into the rear seat (seats were already out to remove the rear deck).
Not complicated but it did require a couple of hours to disassemble and
make everything look nice.
directly from the
battery and I picked up a Monster Cable power kit from a local shop for
$25. It has about 20 feet of 8 gage power, 4 feet of 8 gage ground,
20 feet of 16 gage turn on wire, a inline 30 amp fuse, ring connectors,
wire ties etc. I attached the +12 power to the power junction box
located next to the battery, in my pictures here, you see two fuse
holders, one for the Basslink and one for my Valentine 1. You can
see
the grommet in the firewall where I ran the power cable through, you need
to remove the plastic cover from behind the battery to gain access to this
grommet. Ran the power wire down the passenger side foot well and up
into the rear seat (seats were already out to remove the rear deck).
Not complicated but it did require a couple of hours to disassemble and
make everything look nice.
I am quite impressed with the sound of the factory system now. Its
not going to win any competitions and the staging is a bit biased, but I
am satisfied. The bass I must say is very impressive, while I am not
getting frequencies in the 20 Hz area (either its the Basslink or the
factory system has some sort of sub-sonic filter, I am not sure) the
response is deep and tight. The active servo design does its job
quite well and for the type of music I listen to
(house/techno/break-beat) there is plenty of bass. One of the other
nice features here, is there is virtually no vibrations from the trunk.
Almost all the low frequency energy is fired into the passenger
compartment and is not bouncing around inside the trunk.
7/4/03 Head Unit Update
Given the fact that the majority of my music now comes from MP3's, over
140 songs can be burned onto one 700 meg CD-R. This is almost double
what the factory 6 disc CD changer can accommodate, so the factory CD
changer was sold on Ebay for $190 and a Panasonic CQ-DFXP683U MP3 player
was purchased ($141 from Ebay). This particular head has an internal
Mosfet 50 amplifier and a non-fading dedicated sub out.
 We
start by removing the ashtray and taking out two philips screws, the
ashtray assembly lifts out and you disconnect the power cables on the
bottom of the assembly. There are two metal clips on the bottom of
the factory head unit, you can use a small flat blade screw driver to bend
these down as you push on the radio from behind (hope you have small
hands!) do this on each side till the radio slides out easy.
We
start by removing the ashtray and taking out two philips screws, the
ashtray assembly lifts out and you disconnect the power cables on the
bottom of the assembly. There are two metal clips on the bottom of
the factory head unit, you can use a small flat blade screw driver to bend
these down as you push on the radio from behind (hope you have small
hands!) do this on each side till the radio slides out easy.
 On
the later model W201's, the sound system consists of a two channel Alpine
cassette that feeds its signals into a Y splitter, one pair feeds the door
sub amp and the other pair goes to the console mounted fader, this splits
the signals into front/rear. One important item to note here, only
the positive leads go through the fader, the grounds are all shared and
not fed through the fader. To use a 4 channel after market head unit
(and bypass the manual OE fader) you really should run all new speaker
wire and not mess with the original wires. I ran new wires for the
fronts and used the OE wires for the rear, but I had to tap into them
BEFORE the fader.
On
the later model W201's, the sound system consists of a two channel Alpine
cassette that feeds its signals into a Y splitter, one pair feeds the door
sub amp and the other pair goes to the console mounted fader, this splits
the signals into front/rear. One important item to note here, only
the positive leads go through the fader, the grounds are all shared and
not fed through the fader. To use a 4 channel after market head unit
(and bypass the manual OE fader) you really should run all new speaker
wire and not mess with the original wires. I ran new wires for the
fronts and used the OE wires for the rear, but I had to tap into them
BEFORE the fader.
 Like
I mentioned above, I tapped into the rear speaker wires here at the fader,
this allowed me to power the rear speakers and still feed a high level
signal into the OE amp for the door woofers. The wire schematics
from the service CD come in very handy for these types of projects.
If you don't already have one of these CD's, pick up one from Ebay, they
can be had for $10-15.
Like
I mentioned above, I tapped into the rear speaker wires here at the fader,
this allowed me to power the rear speakers and still feed a high level
signal into the OE amp for the door woofers. The wire schematics
from the service CD come in very handy for these types of projects.
If you don't already have one of these CD's, pick up one from Ebay, they
can be had for $10-15.
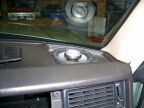 To
run new speaker wires to the front speakers, required removing them and
feeding wire from the OE deck location through the glove box area (see
next picture) and up to the speaker (right side). These are the
Infinity Kappa 43.5 co-ax, very nice sounding 4" speakers.
To
run new speaker wires to the front speakers, required removing them and
feeding wire from the OE deck location through the glove box area (see
next picture) and up to the speaker (right side). These are the
Infinity Kappa 43.5 co-ax, very nice sounding 4" speakers.
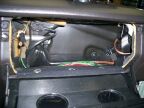 Here
is what the area behind the glove box looks like. You may not really
need to remove the glove box, but I found it much easier to run and secure
the new speaker wire.
Here
is what the area behind the glove box looks like. You may not really
need to remove the glove box, but I found it much easier to run and secure
the new speaker wire.
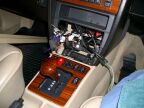
 Once
I had removed the factory head unit, I removed the OE mounting clips, they
slide right off and allow you to mount a sleeve for the new head unit.
As for the sleeve, normally you bend tabs inwards on the top, bottom and
sides of the sleeve, in the case of our W201's, your really only going to
get the bottom tabs to hold, none on the top and very little from the
sides.
Once
I had removed the factory head unit, I removed the OE mounting clips, they
slide right off and allow you to mount a sleeve for the new head unit.
As for the sleeve, normally you bend tabs inwards on the top, bottom and
sides of the sleeve, in the case of our W201's, your really only going to
get the bottom tabs to hold, none on the top and very little from the
sides.
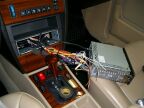 The
Panasonic is almost ready to be slid into place. A bit of testing to
insure everything is working correctly.
The
Panasonic is almost ready to be slid into place. A bit of testing to
insure everything is working correctly.
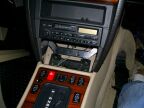
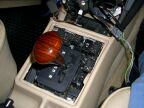
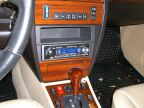 The
Panasonic fully seated and ready for some MP3's. The color of this
unit is a dark gray, not black and the illumination is blue, so it does
not really match the yellow of the instruments.
The
Panasonic fully seated and ready for some MP3's. The color of this
unit is a dark gray, not black and the illumination is blue, so it does
not really match the yellow of the instruments.
 Since
the Panasonic has non-fading dedicated sub outputs, I ran a set of Monster
Cable Interlink 400 signal cables from the head unit into the trunk to
provide signals to the Infinity Basslink. The passenger side carpet,
door sill and plastic floor plate need to be removed. You can route
cables in the plastic OE trays, the tricky part is getting the wires past
the seat belt.
Since
the Panasonic has non-fading dedicated sub outputs, I ran a set of Monster
Cable Interlink 400 signal cables from the head unit into the trunk to
provide signals to the Infinity Basslink. The passenger side carpet,
door sill and plastic floor plate need to be removed. You can route
cables in the plastic OE trays, the tricky part is getting the wires past
the seat belt.
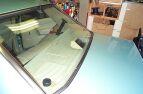
 Of
course the rear seat needs to be removed. Start with the bottom seat
cushion, push up on the red tabs and the seat lifts right out. The
rear seat back requires you to remove three 8mm nuts and it will pull
outward and then you push up.
Of
course the rear seat needs to be removed. Start with the bottom seat
cushion, push up on the red tabs and the seat lifts right out. The
rear seat back requires you to remove three 8mm nuts and it will pull
outward and then you push up.
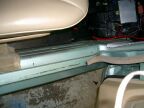
 You
can see my audio and power cables as they enter the rear seat area right
by the vacuum door lock motor. The wires are routed upwards
following the OE wire track.
You
can see my audio and power cables as they enter the rear seat area right
by the vacuum door lock motor. The wires are routed upwards
following the OE wire track.
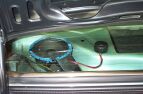
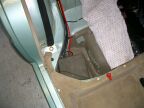
 Power/signal
enter the trunk through a OE opening shown in this picture.
Power/signal
enter the trunk through a OE opening shown in this picture.
 The
right rear trunk panel was removed so I could hide the OE CD changer cable
(not needed anymore) and to better wrap/tie up my cables in the trunk.
At this time I also removed my Basslink, cleaned it up, tightened the
mounting brackets (they were vibrating) and cleaned up the wires going
into it.
The
right rear trunk panel was removed so I could hide the OE CD changer cable
(not needed anymore) and to better wrap/tie up my cables in the trunk.
At this time I also removed my Basslink, cleaned it up, tightened the
mounting brackets (they were vibrating) and cleaned up the wires going
into it.

<Back
 Becker its made by Alpine. This made locating a factory CD
changer a bit more
challenging, but I did manage to locate one on EBay that was new, came
with the cover and all necessary cables. Only thing it did not come
with was the mounting bracket, so I had to fabricate some myself.
The MB cars are pre-wired from the factory with the CD changer cables and
power cables. In the case of the 190, the cables are located on the
passenger side of the trunk behind the plastic cover near the tail lights.
This install was very simple: mount the changer, plug in the cables
and were done. I installed the changer in the factory location that
still leaves the small storage compartment usable.
Becker its made by Alpine. This made locating a factory CD
changer a bit more
challenging, but I did manage to locate one on EBay that was new, came
with the cover and all necessary cables. Only thing it did not come
with was the mounting bracket, so I had to fabricate some myself.
The MB cars are pre-wired from the factory with the CD changer cables and
power cables. In the case of the 190, the cables are located on the
passenger side of the trunk behind the plastic cover near the tail lights.
This install was very simple: mount the changer, plug in the cables
and were done. I installed the changer in the factory location that
still leaves the small storage compartment usable. 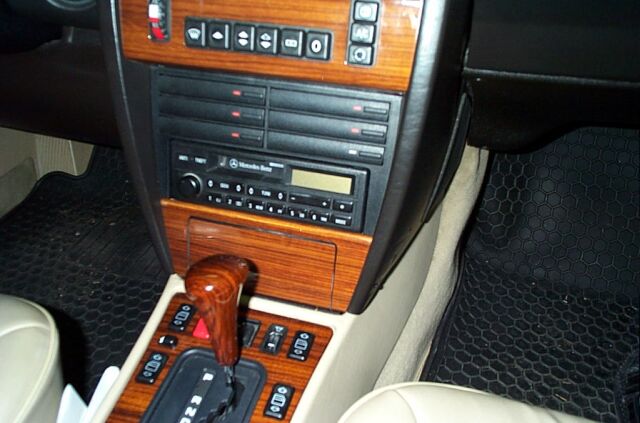 factory head out of a 93 190 and picked it up for about $60. I don't
really have step by step instructions for removing the head, but you need
to remove the ashtray and then the two screws hidden behind it.
After that, the Zebrano trim panel pulls out. The head unit is held
in place by two tabs underneath, so if you use a small flat blade screw
driver, you can bend them down (be careful, they are plastic and you don't
want to break them) to slide the head unit out). Anyway, after
installing the new unit, I realized that now only the right output on my
old deck was blown but the left side had a reduced output as well.
So, now I had a new fully functional head unit.
factory head out of a 93 190 and picked it up for about $60. I don't
really have step by step instructions for removing the head, but you need
to remove the ashtray and then the two screws hidden behind it.
After that, the Zebrano trim panel pulls out. The head unit is held
in place by two tabs underneath, so if you use a small flat blade screw
driver, you can bend them down (be careful, they are plastic and you don't
want to break them) to slide the head unit out). Anyway, after
installing the new unit, I realized that now only the right output on my
old deck was blown but the left side had a reduced output as well.
So, now I had a new fully functional head unit.