 This
is the dash of the 500E. The burl wood is in excellent condition (except
for the center console piece not shown). The previous owner installed a
Pioneer CD and changer.
This
is the dash of the 500E. The burl wood is in excellent condition (except
for the center console piece not shown). The previous owner installed a
Pioneer CD and changer.
 This
is another interior dash picture. The steering wheel, dash, armrest and
door panels are in exceptional condition for their age
This
is another interior dash picture. The steering wheel, dash, armrest and
door panels are in exceptional condition for their age
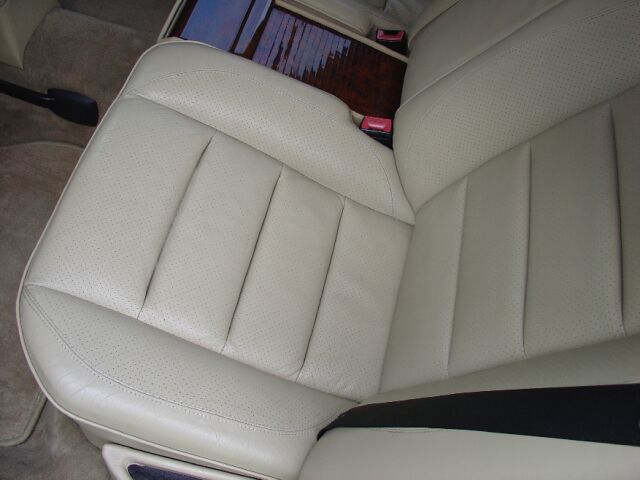
 The
front seats shown almost no wear at all and the leather is soft and without
cracks.
The
front seats shown almost no wear at all and the leather is soft and without
cracks.
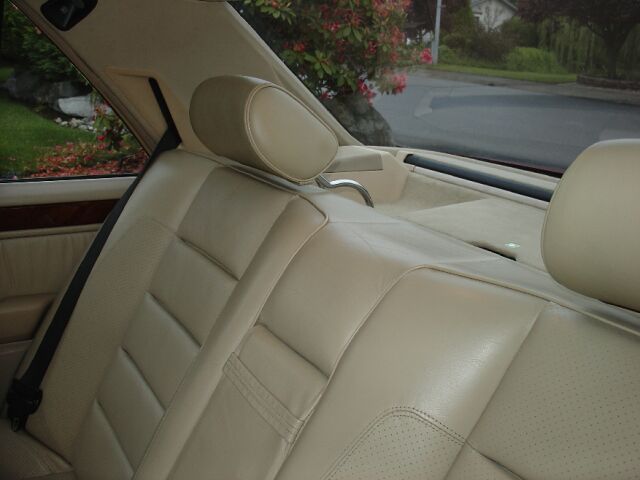 The
rear seats are also in excellent condition, but needed a good cleaning along
with some leather conditioner.
The
rear seats are also in excellent condition, but needed a good cleaning along
with some leather conditioner.
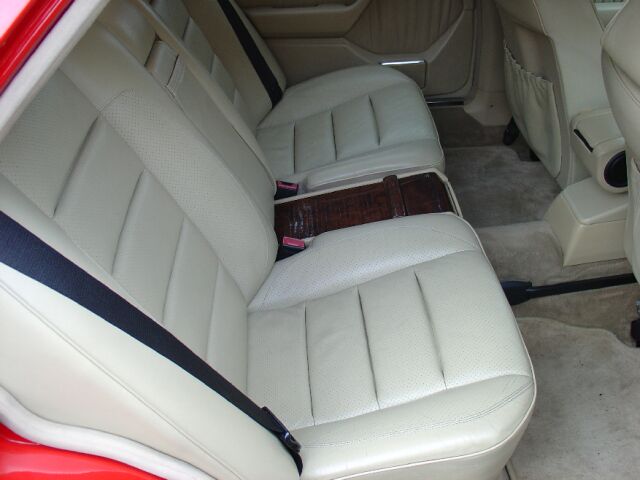
 Another
picture of the rear seat bottom
Another
picture of the rear seat bottom
 Here
you can see more of the rear seat area along with the passenger side door panel.
Here
you can see more of the rear seat area along with the passenger side door panel.
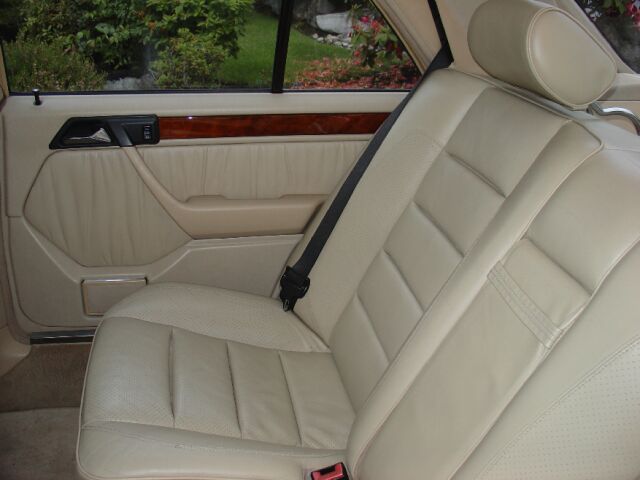
 The
rear seat as seen from the passenger side.
The
rear seat as seen from the passenger side.
Not all older cars have seats in this good of shape, so restoration or installing custom fit seat covers is sometimes necessary.
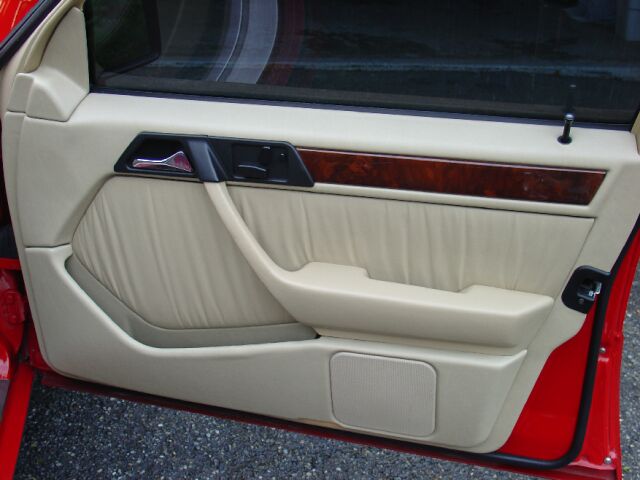
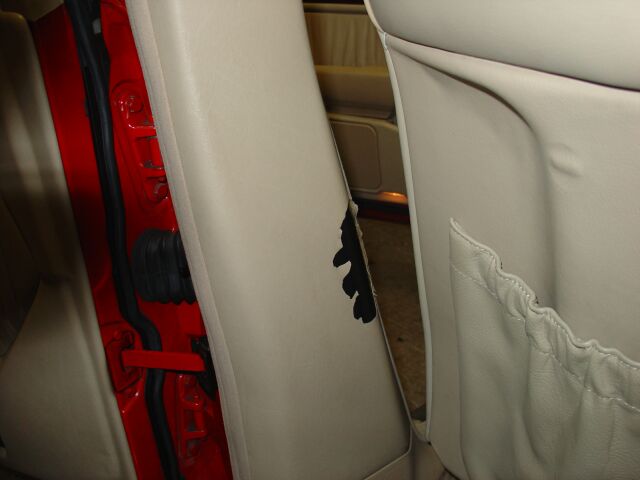
Passenger side front door panel. Aside from the material around the
map pocket needing to be re-glued, all the panels are in excellent condition.
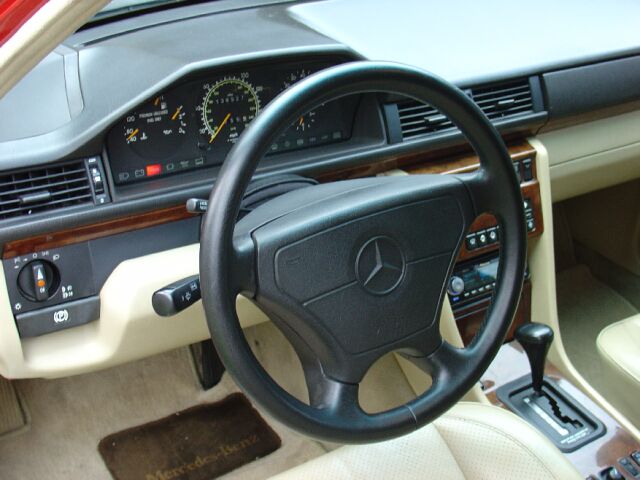 The
500E came from the factory with the smaller diameter Sportline steering wheel.
This particular wheel is also in excellent shape for its age.
The
500E came from the factory with the smaller diameter Sportline steering wheel.
This particular wheel is also in excellent shape for its age.
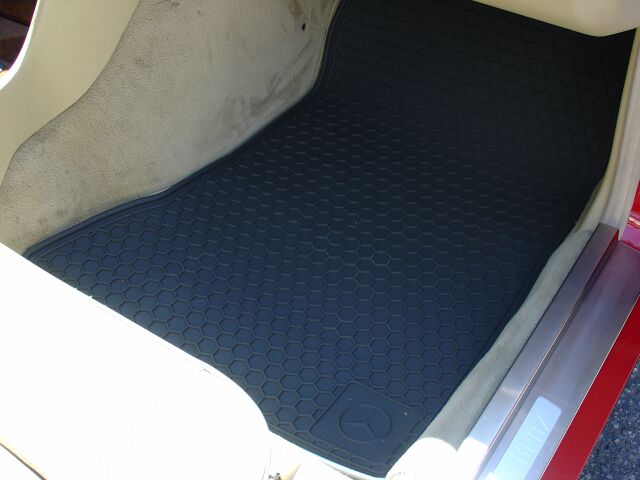
This car arrived with beige Mercedes floor mats, I promptly replaced
these with a set of OE W124 rubber all season mats. This is my 2nd set, my
1st set lasted well over 10 years and lived in several different cars, very
durable and well worth the money.
 The
inside of my arm-rest storage had some holes present from a past cell phone
install. To clean it up a bit, I installed some black felt (self
adhesive). The installation is simple, just cut the felt to fit the curves
of your storage compartment. This was done in three pieces, the front
piece and two smaller pieces on either side of the phone jack recess.
The
inside of my arm-rest storage had some holes present from a past cell phone
install. To clean it up a bit, I installed some black felt (self
adhesive). The installation is simple, just cut the felt to fit the curves
of your storage compartment. This was done in three pieces, the front
piece and two smaller pieces on either side of the phone jack recess.
3-25-06 - Burl wood steering
wheel update
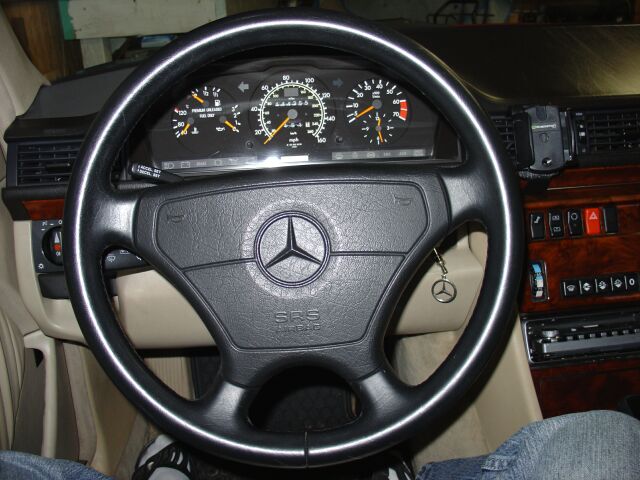 The
OE 500E steering wheel is the same used on the Sportline models, its 390mm vs.
the 400mm normal wheel. While it is a tad smaller in diameter, its not
very ergonomic, so when the chance came my way to pick up a new wheel, I of
course jumped on the opportunity.
The
OE 500E steering wheel is the same used on the Sportline models, its 390mm vs.
the 400mm normal wheel. While it is a tad smaller in diameter, its not
very ergonomic, so when the chance came my way to pick up a new wheel, I of
course jumped on the opportunity.
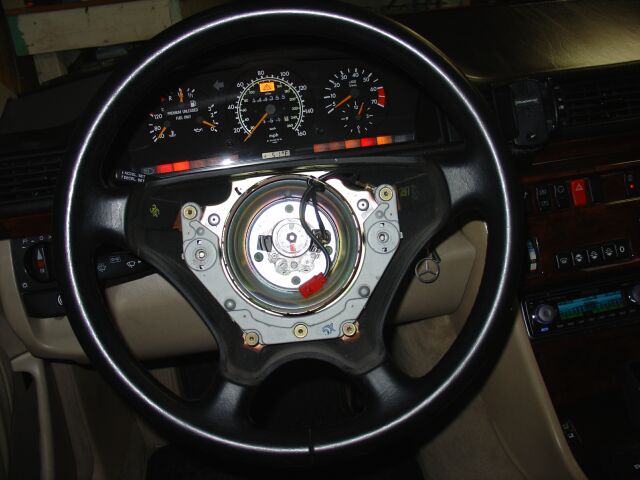
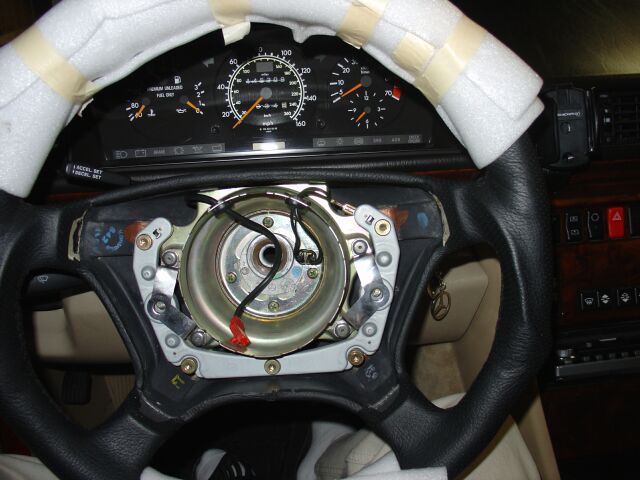
 First,
you must remove the airbag, you need a T30 torx bit and a bit extension to get
the job done. In this picture you can see the twist type driver I used, MB
has a special tool for this process, but you can get by without it. Make
sure your bit extension is slim, otherwise it will not fit into the hole on the
back of the steering wheel.
First,
you must remove the airbag, you need a T30 torx bit and a bit extension to get
the job done. In this picture you can see the twist type driver I used, MB
has a special tool for this process, but you can get by without it. Make
sure your bit extension is slim, otherwise it will not fit into the hole on the
back of the steering wheel.
 Once
you have the airbag off, you just need to unplug it (please make sure your
ignition and preferably your battery is disconnected before you do this) The
next chore is to get that stinking 10mm hex nut off.
Once
you have the airbag off, you just need to unplug it (please make sure your
ignition and preferably your battery is disconnected before you do this) The
next chore is to get that stinking 10mm hex nut off.
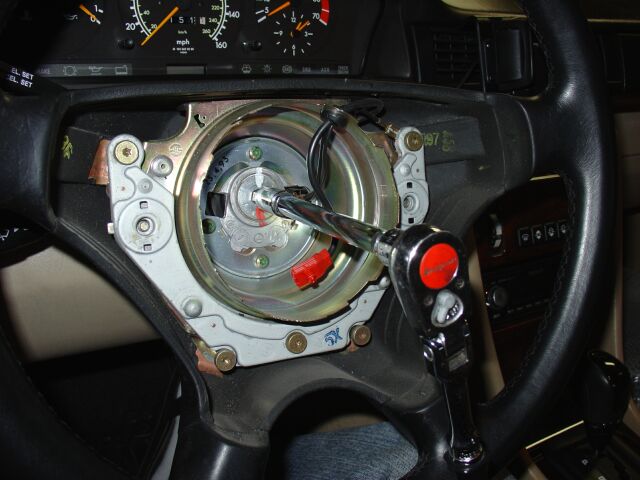 Ok, so this is the most difficult part. This nut is on very tight.
The best course of action is to have a 2nd set of hands to
hold the wheel in
place (ignition on, ignition lock
off) and you will need your 10mm hex socket, socket extension and socket wrench.
This time aground, I used a four foot section of copper pipe as a lever over the
end of the socket wrench, with this lever, I was able to break the nut loose
with minimal effort.
Ok, so this is the most difficult part. This nut is on very tight.
The best course of action is to have a 2nd set of hands to
hold the wheel in
place (ignition on, ignition lock
off) and you will need your 10mm hex socket, socket extension and socket wrench.
This time aground, I used a four foot section of copper pipe as a lever over the
end of the socket wrench, with this lever, I was able to break the nut loose
with minimal effort.
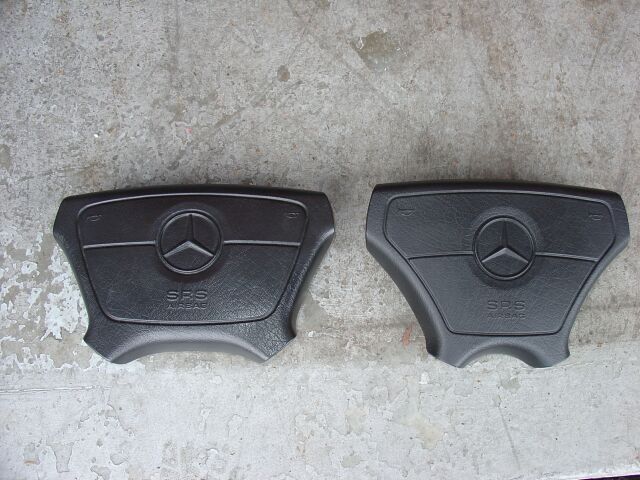 The
new wheel I purchased used the normal style airbag, so I had to first locate
one. Since my new wheel was a 92-97 wheel, I needed a matching airbag, the
98-99 airbags were a bit different and would not fit (looked very similar
though). To top it off, my new wheel arrived with no internals (horn
contact ring or airbag mounting assembly), upon further research, you can not
purchase this piece separate from the steering wheel and the internals from a
98-99 are not compatible. Fortunately, the person who sold me the wheel
was kind enough to send me a 92 S Class wheel with the internals intact, so I
swapped them over and was good to go.
The
new wheel I purchased used the normal style airbag, so I had to first locate
one. Since my new wheel was a 92-97 wheel, I needed a matching airbag, the
98-99 airbags were a bit different and would not fit (looked very similar
though). To top it off, my new wheel arrived with no internals (horn
contact ring or airbag mounting assembly), upon further research, you can not
purchase this piece separate from the steering wheel and the internals from a
98-99 are not compatible. Fortunately, the person who sold me the wheel
was kind enough to send me a 92 S Class wheel with the internals intact, so I
swapped them over and was good to go.
 So here is
the 10mm hex nut unbolted. To remove the wheel, you should just be able to
simply pull it towards you, if its on tight, you can wiggle it back and forth
till it pops
off the steering shaft.
So here is
the 10mm hex nut unbolted. To remove the wheel, you should just be able to
simply pull it towards you, if its on tight, you can wiggle it back and forth
till it pops
off the steering shaft.
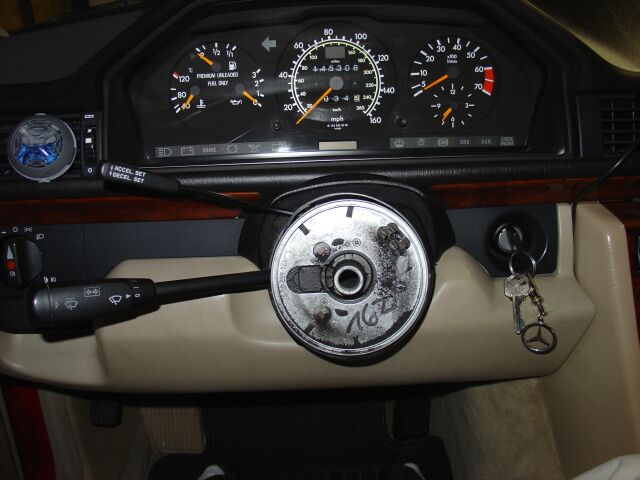 The
steering shaft with the old wheel removed, I took the opportunity here to clean
this up and re-grease the area before installation of the new wheel.
The
steering shaft with the old wheel removed, I took the opportunity here to clean
this up and re-grease the area before installation of the new wheel.
 The
new Brabus type wheel being fitted. This wheel was a newly built wheel
(built on an OE core) and is ergonomically shaped, covered in vented black
leather and Burl wood on the top/bottom. Make sure your wheels are
straight before you mount the wheel. To be safe, I normally mount the
wheel, then go for a short drive to make sure the wheel is aligned correctly,
you don't want to take the airbag off again once you get it back on.
The
new Brabus type wheel being fitted. This wheel was a newly built wheel
(built on an OE core) and is ergonomically shaped, covered in vented black
leather and Burl wood on the top/bottom. Make sure your wheels are
straight before you mount the wheel. To be safe, I normally mount the
wheel, then go for a short drive to make sure the wheel is aligned correctly,
you don't want to take the airbag off again once you get it back on.
 And
the finished product. I like this wheel very much. More information
about steering wheel swaps can be located under my 190E section as well.
And
the finished product. I like this wheel very much. More information
about steering wheel swaps can be located under my 190E section as well.
E55
Steering wheel upgrade
 Although
the burl wood wheel is nice, I always like the smaller diameter all leather AMG
steering wheels. I picked up this two-tone E55 wheel for a good price, as
the grey dye on the top of the wheel was worn off in some areas. I
stripped off the rest of the grey dye to prepare the surface to be re-dyed in
black.
Although
the burl wood wheel is nice, I always like the smaller diameter all leather AMG
steering wheels. I picked up this two-tone E55 wheel for a good price, as
the grey dye on the top of the wheel was worn off in some areas. I
stripped off the rest of the grey dye to prepare the surface to be re-dyed in
black.
 I
did not have a matching AMG airbag for this wheel, so I picked up a 95 500sl
airbag, which I prefer over the slk/clk airbags (the 500sl has the molded MB
star, the slk/clk airbags have a plastic insert with the MB star on it.
I
did not have a matching AMG airbag for this wheel, so I picked up a 95 500sl
airbag, which I prefer over the slk/clk airbags (the 500sl has the molded MB
star, the slk/clk airbags have a plastic insert with the MB star on it.

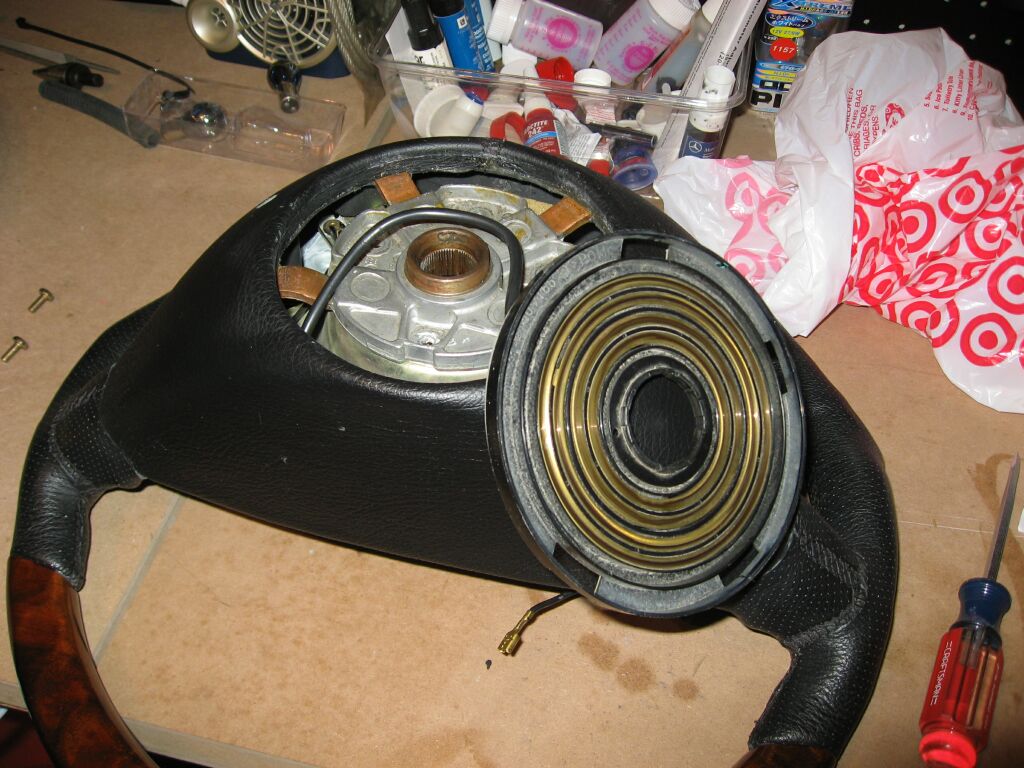
This
is the inside of the burl steering wheel, which uses a earlier design, for the
most part, all the 92-99 wheels are interchangeable, but little modifications
like extending the clock spring horn wires are necessary.

This is the inside of the E55 wheel, the bolt/nuts need to be removed so you can
use the screws from your OE steering wheel (see previous picture)
 You
also need the clock spring (horn contact ring) from your original steering
wheel. If you have a 92+, that is good, but if you are doing a upgrade on
a pre-92 model, you would need to get a clock spring, as yours won't work for
this upgrade.
You
also need the clock spring (horn contact ring) from your original steering
wheel. If you have a 92+, that is good, but if you are doing a upgrade on
a pre-92 model, you would need to get a clock spring, as yours won't work for
this upgrade.
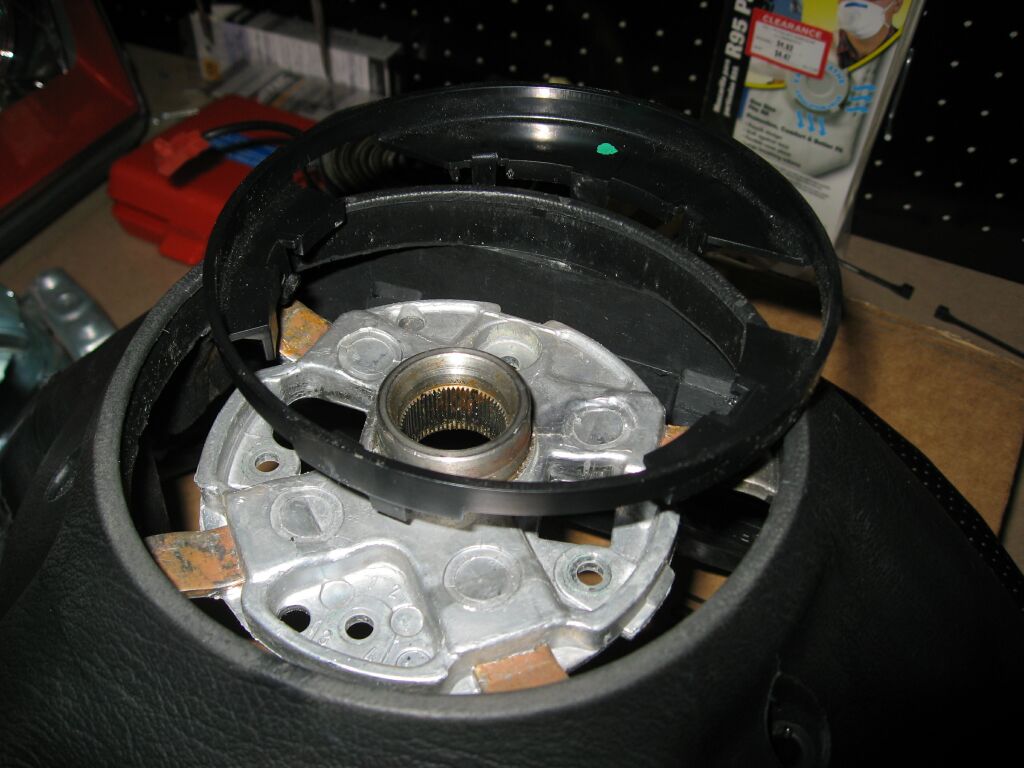 The
E55 wheel does not use a clock spring like the older style wheels, so you need
to pull the plastic filler ring out so you can fit your clock spring.
The
E55 wheel does not use a clock spring like the older style wheels, so you need
to pull the plastic filler ring out so you can fit your clock spring.
 Clock
spring fitted to the E55 wheel, you can then reuse your screws from the original
wheel so bolt this in place.
Clock
spring fitted to the E55 wheel, you can then reuse your screws from the original
wheel so bolt this in place.
 E55
wheel with the older clock spring fitted.
E55
wheel with the older clock spring fitted.
 Routing
of your horn and airbag wires are a little different also. The airbag plug
won't fit through this hole, so you can cut out a small piece of the metal and
fit a grommet to protect the wire.
Routing
of your horn and airbag wires are a little different also. The airbag plug
won't fit through this hole, so you can cut out a small piece of the metal and
fit a grommet to protect the wire.
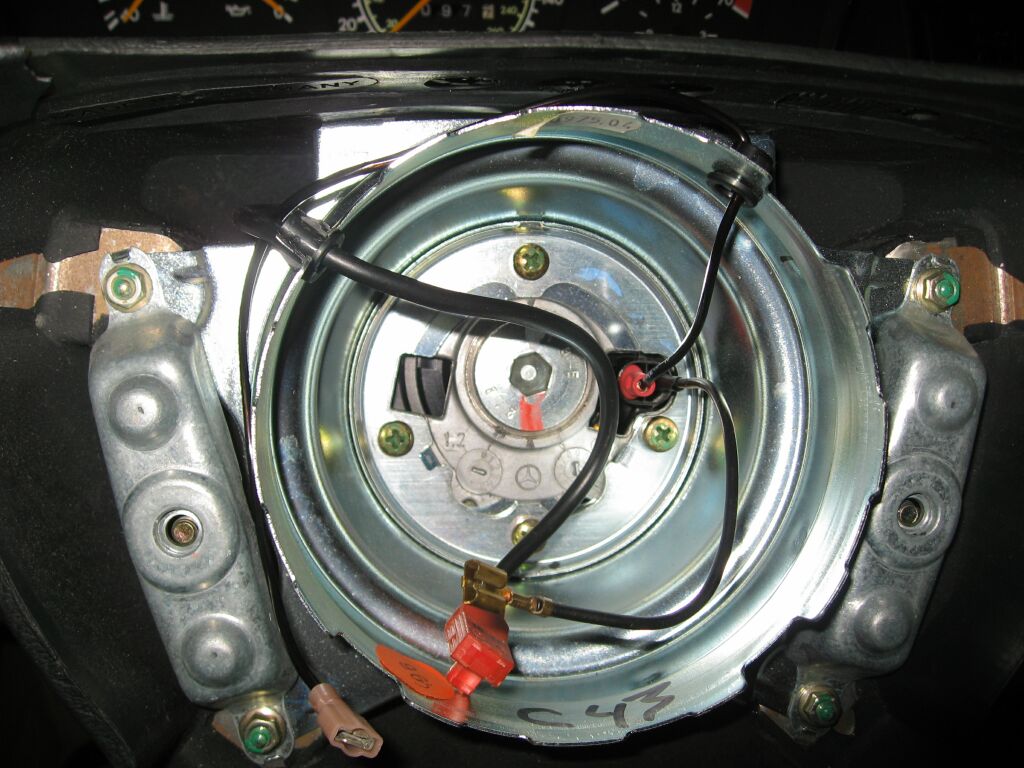 The
wires from the clock spring also need to be extended to reach the side horn
buttons. You can see that one of these wires is not removable from the
clock spring, so I extended it, the 2nd wire is completely new and they are
routed through new grommets and looped around the outer perimeter of the
assembly. One wire is plugged into the left airbag horn button and the
other wire is plugged into the right side airbag horn wire.
The
wires from the clock spring also need to be extended to reach the side horn
buttons. You can see that one of these wires is not removable from the
clock spring, so I extended it, the 2nd wire is completely new and they are
routed through new grommets and looped around the outer perimeter of the
assembly. One wire is plugged into the left airbag horn button and the
other wire is plugged into the right side airbag horn wire.
 The
finished product. The horns work as they should and the airbag works as it
should. The E55 wheel is thicker and smaller in diameter than your stock
wheel, which makes for a nice upgrade to the earlier model MB vehicles.
The
finished product. The horns work as they should and the airbag works as it
should. The E55 wheel is thicker and smaller in diameter than your stock
wheel, which makes for a nice upgrade to the earlier model MB vehicles.
8-10-09 - RAID Steering wheel install
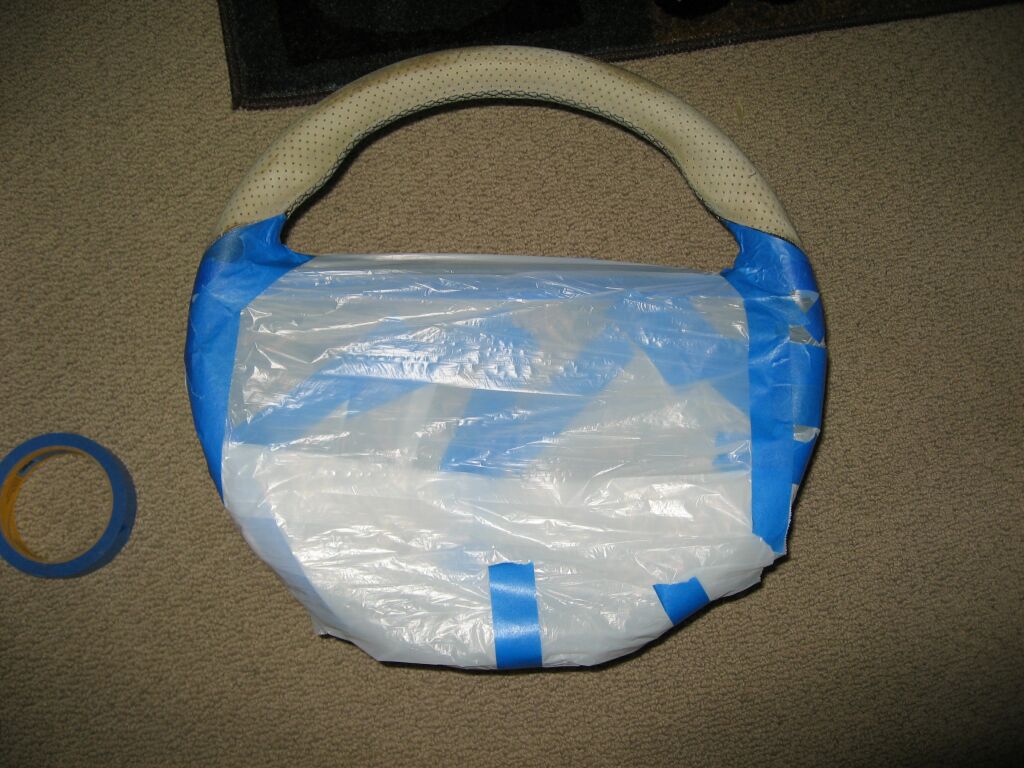
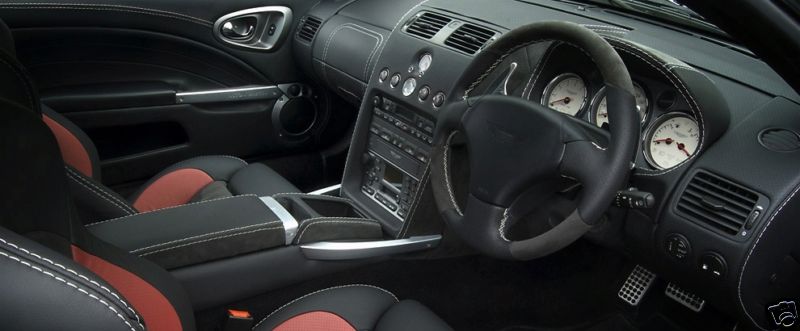 I
bought this steering wheel from Ebay and it was complete with a compatible
Mercedes hub. RAID wheels are popular in Europe and are one of the
only aftermarket wheels to include a airbag. This is the wheel as used
on a Aston Martin, although the one I have is not covered in suede.
I
bought this steering wheel from Ebay and it was complete with a compatible
Mercedes hub. RAID wheels are popular in Europe and are one of the
only aftermarket wheels to include a airbag. This is the wheel as used
on a Aston Martin, although the one I have is not covered in suede.
 This
is the RAID hub for Mercedes. It will accept the early contact ring
(92-93) or the plastic insert for the later models (94+)
This
is the RAID hub for Mercedes. It will accept the early contact ring
(92-93) or the plastic insert for the later models (94+) This
is my 93 contact ring before installation into the RAID hub.
This
is my 93 contact ring before installation into the RAID hub.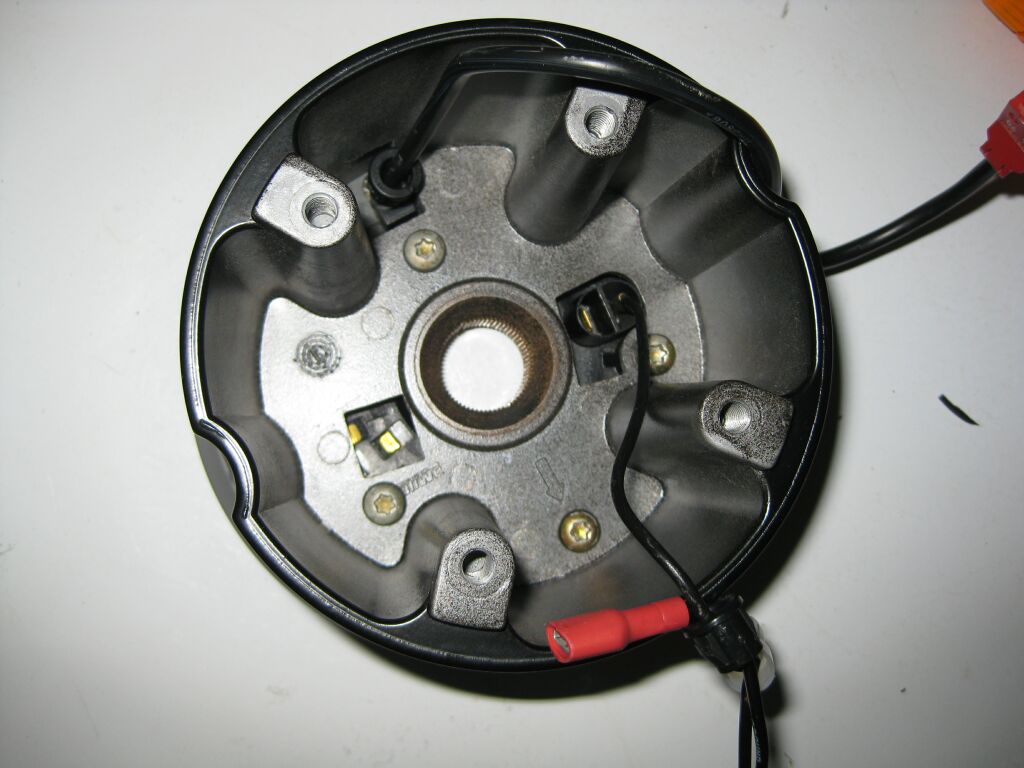 As
you can see here, the contact ring fits perfectly into the RAID hub
As
you can see here, the contact ring fits perfectly into the RAID hub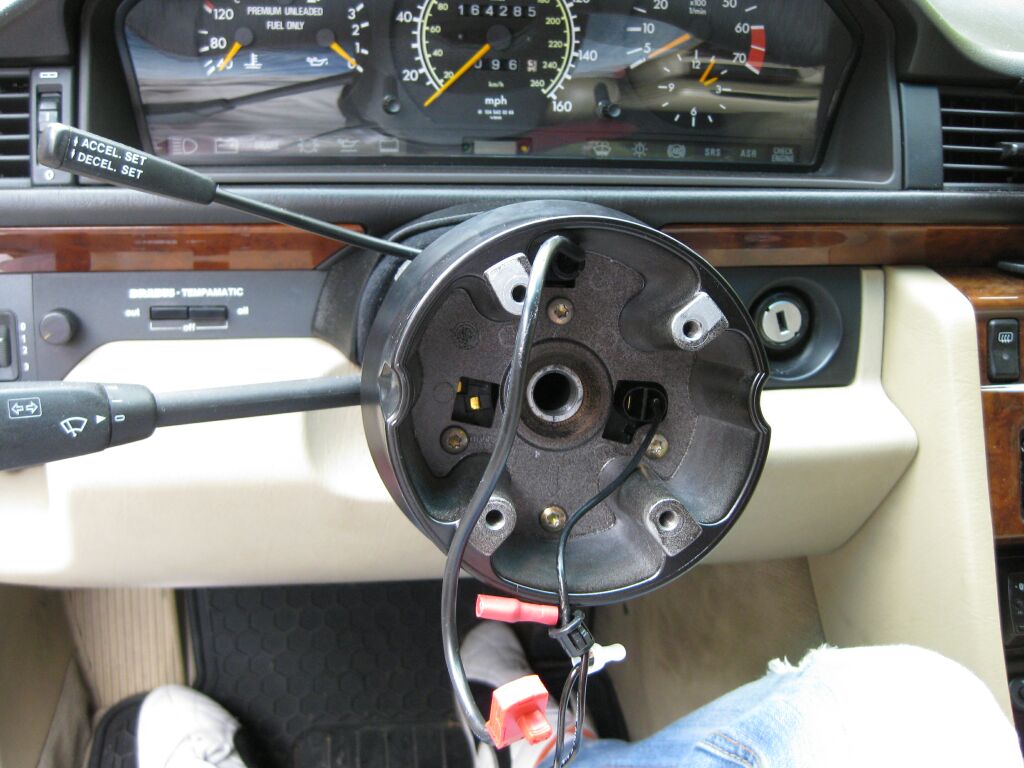 Since
removal of the steering wheel has already been covered, I won't repeat those
procedures. At this point, the RAID hub is installed. Needed
wiring for the steering wheel horn buttons is included with the wheel
Since
removal of the steering wheel has already been covered, I won't repeat those
procedures. At this point, the RAID hub is installed. Needed
wiring for the steering wheel horn buttons is included with the wheel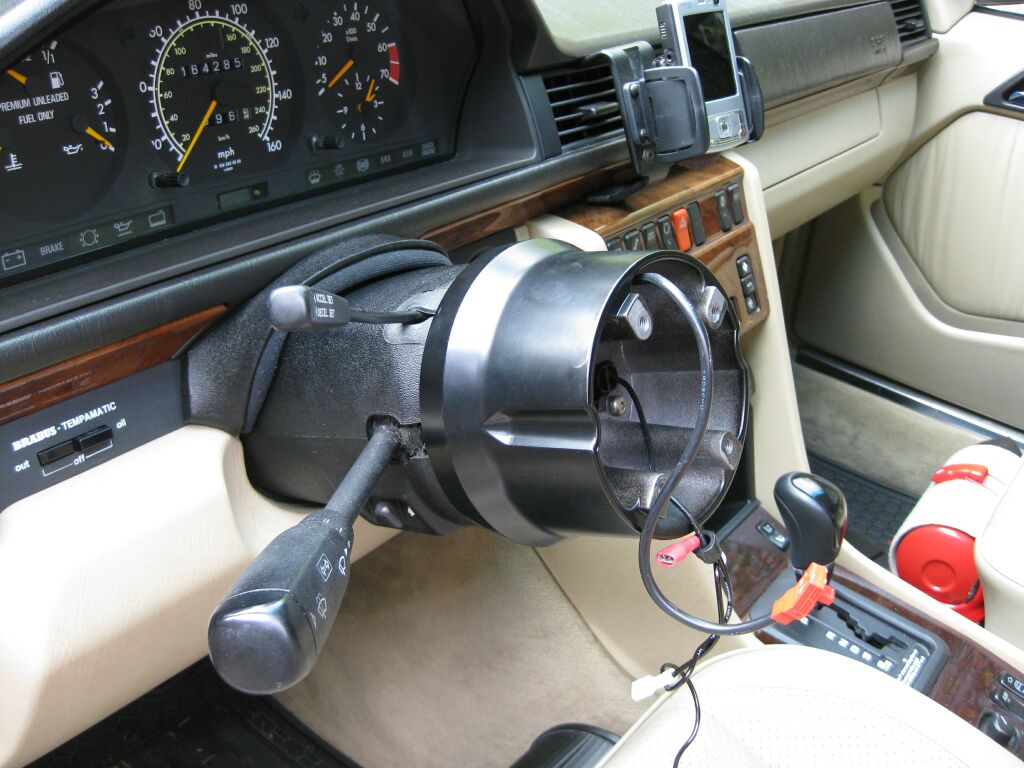 Another
angle of the hub after installation
Another
angle of the hub after installation Here
is the wheel installed. The included horn wires plug into a junction
box inside the wheel and then you can splice them into your contact ring
wires. I insulated these wires with electrical tape as a precautionary
measure. The horn buttons are thin membranes mounted under the leather
Here
is the wheel installed. The included horn wires plug into a junction
box inside the wheel and then you can splice them into your contact ring
wires. I insulated these wires with electrical tape as a precautionary
measure. The horn buttons are thin membranes mounted under the leather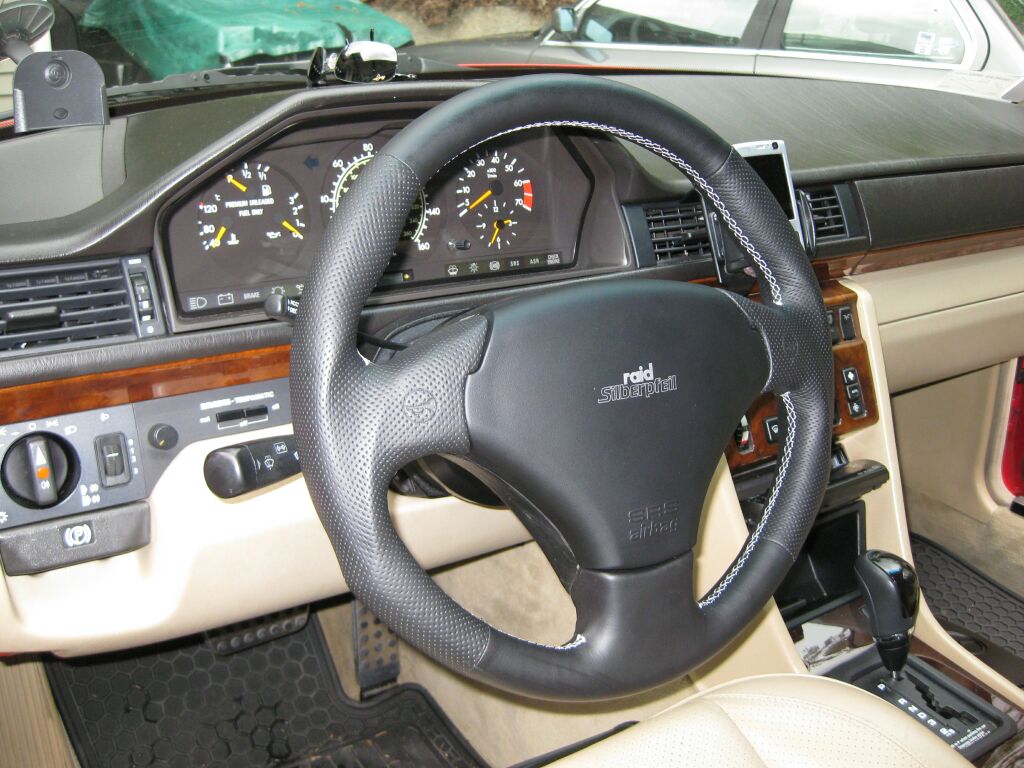 This
is the final result. The airbag secures to the wheel the same way as a
OE Mercedes wheel. The RAID is about 1" smaller than the E55 wheel and
is full leather and perforated leather.
At some point I would like to affix a Mercedes star to the center of the
airbag as I don't care for the white lettering nor the white stitching.
I still have the E55 wheel and its a tough choice as to which one to leave
on the car, I may put the AMG wheel back on since I now have more AMG parts
on the 500e and save this RAID for my next W124.
This
is the final result. The airbag secures to the wheel the same way as a
OE Mercedes wheel. The RAID is about 1" smaller than the E55 wheel and
is full leather and perforated leather.
At some point I would like to affix a Mercedes star to the center of the
airbag as I don't care for the white lettering nor the white stitching.
I still have the E55 wheel and its a tough choice as to which one to leave
on the car, I may put the AMG wheel back on since I now have more AMG parts
on the 500e and save this RAID for my next W124. Another
view of the steering wheel
Another
view of the steering wheel1-10-06 - Center Console Wood Replacement
 As
with all older Mercedes, the wood over time fades and cracks. Since they
all do this, its difficult to find a used part that is not in worse shape than
yours. My center wood panel was very faded and cracked. I tried
re-finishing the wood, but since it is not real burl wood, its easy to sand
right through the thin layer of burl. One interesting item to note, I was
going to replace my console wood with a 94-95 console (no fader cutout) but MB
no longer offers it, only the pre-94/95 item with the fader cutout and they
offer 94/95 owners a black plastic plug for the fader hole!
As
with all older Mercedes, the wood over time fades and cracks. Since they
all do this, its difficult to find a used part that is not in worse shape than
yours. My center wood panel was very faded and cracked. I tried
re-finishing the wood, but since it is not real burl wood, its easy to sand
right through the thin layer of burl. One interesting item to note, I was
going to replace my console wood with a 94-95 console (no fader cutout) but MB
no longer offers it, only the pre-94/95 item with the fader cutout and they
offer 94/95 owners a black plastic plug for the fader hole!
This is my original console wood. Very faded and cracked in numerous places. This is one wood piece that has high visibility in the vehicle, and for me, I want it as clean as possible.

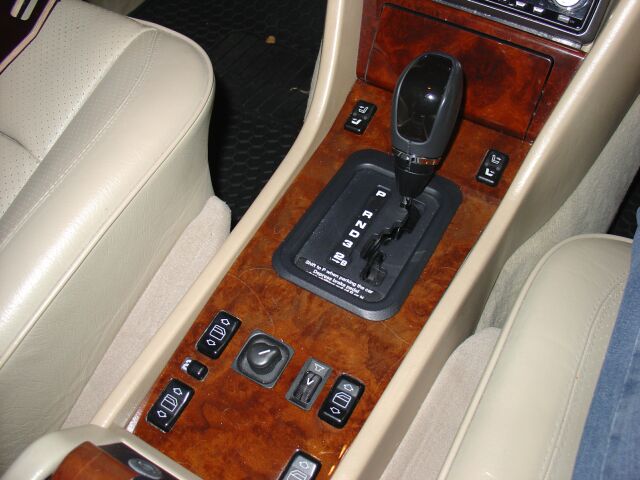
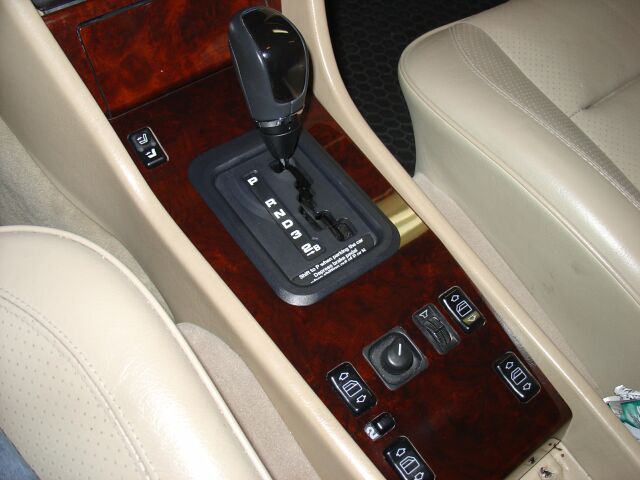 The
new wood console in place. Some of the switch holes were a bit tight and
required some light filing to allow the switch's to fit without forcing them
into place. Of course since its new, its a bit darker than the rest of the
trim in the car now, really no way around that, unless of course you want to
replace all your trim! The match is very good though and since the other
trim is vertical vs. horizontal, its difficult to tell there is a mismatch.
The
new wood console in place. Some of the switch holes were a bit tight and
required some light filing to allow the switch's to fit without forcing them
into place. Of course since its new, its a bit darker than the rest of the
trim in the car now, really no way around that, unless of course you want to
replace all your trim! The match is very good though and since the other
trim is vertical vs. horizontal, its difficult to tell there is a mismatch.12-5-05 - Shifter Shaft Replacement and W203 Shift knob
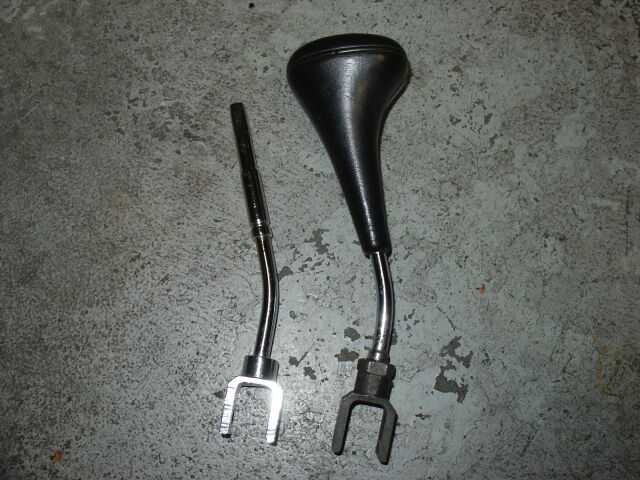
 I
never did like the OE shift knobs on the W124's and W201's, nor did I like the
fact that you couldn't just unscrew the knob and replace it. In the past,
if you wanted to upgrade, you have to replace the entire knob assembly or cut
off the old knob (exposing the bare shaft) and epoxy a new knob onto the
original shaft. Here you can see a W202 shaft next to a OE shaft with the
knob cut away. The W202 part (A2022670401) is a direct bolt on replacement
for the W124 and W201 and provides you a shorter and thicker shaft to use the
newer style (twist on) type of knobs found in the W202, W140, W203 ect.)
I
never did like the OE shift knobs on the W124's and W201's, nor did I like the
fact that you couldn't just unscrew the knob and replace it. In the past,
if you wanted to upgrade, you have to replace the entire knob assembly or cut
off the old knob (exposing the bare shaft) and epoxy a new knob onto the
original shaft. Here you can see a W202 shaft next to a OE shaft with the
knob cut away. The W202 part (A2022670401) is a direct bolt on replacement
for the W124 and W201 and provides you a shorter and thicker shaft to use the
newer style (twist on) type of knobs found in the W202, W140, W203 ect.) This
picture shows the OE shifter shaft (minus OE knob) and the W202 shifter shaft
with a W203 shift knob on it
This
picture shows the OE shifter shaft (minus OE knob) and the W202 shifter shaft
with a W203 shift knob on it I
bought an entire W203 shifter assembly, boot, knob, shift ring, W/S switch and
shift indicator. I picked this up for the incredible price of $2 plus
shipping, around $8 total. Although most of the parts can't easily be
retro fitted to the W124, the knob was in perfect condition and would work for
this project.
I
bought an entire W203 shifter assembly, boot, knob, shift ring, W/S switch and
shift indicator. I picked this up for the incredible price of $2 plus
shipping, around $8 total. Although most of the parts can't easily be
retro fitted to the W124, the knob was in perfect condition and would work for
this project.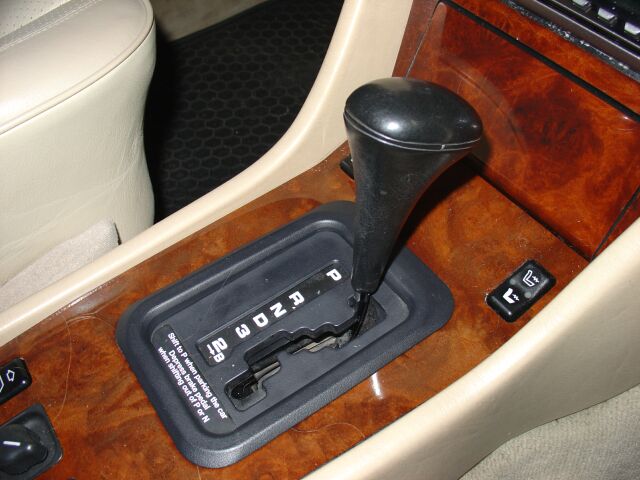
This is the original shift knob that was OE on most all W124/W20's and other early MB models

First we need to remove the center console storage box. Although not shown here, there are two philips screws in the front of the box, take them out and the box lifts out. This screw (shown) is what you need to remove to lift out the center console wood. Be careful lifting out the wood, you don't want to stress it, you run the risk of it cracking (if its not already cracked) and its best to lift the wood up and carefully remove the power window switch's.
 Before
lifting the console wood up, you need to remove the black plastic trim around
the shifter housing. This comes up rather easy using your fingers.
Before
lifting the console wood up, you need to remove the black plastic trim around
the shifter housing. This comes up rather easy using your fingers.
Once the power window buttons have been released from the console wood, you can unplug the heated seat buttons (if you have heated seats of course) and the wood will lift right out.
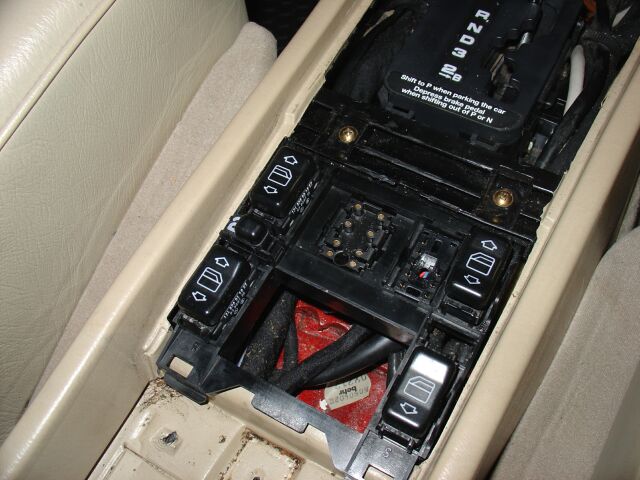 You
can see the assembly that the power window switch's sit in, this whole assembly
is kind of loose and will lift up when you lift up the center console wood, I
applied pressure on each of the four power window switch's till they popped out
of their mount (on the console wood), the fader control and power window control
came out of their socket and stayed attached to the console wood. (see below
picture)
You
can see the assembly that the power window switch's sit in, this whole assembly
is kind of loose and will lift up when you lift up the center console wood, I
applied pressure on each of the four power window switch's till they popped out
of their mount (on the console wood), the fader control and power window control
came out of their socket and stayed attached to the console wood. (see below
picture)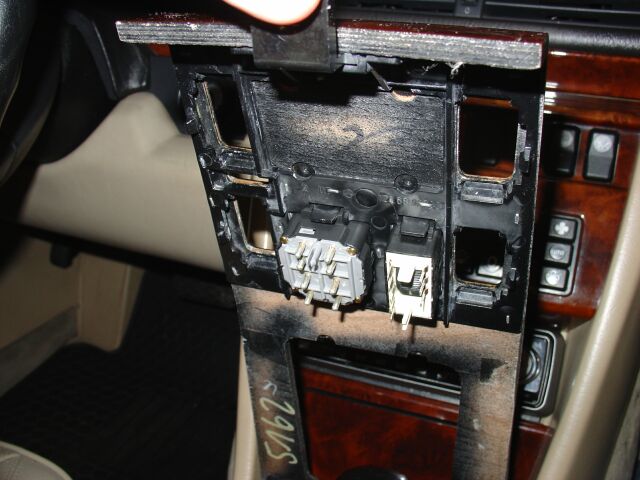
Under side of console wood showing fader and power window switch still attached.
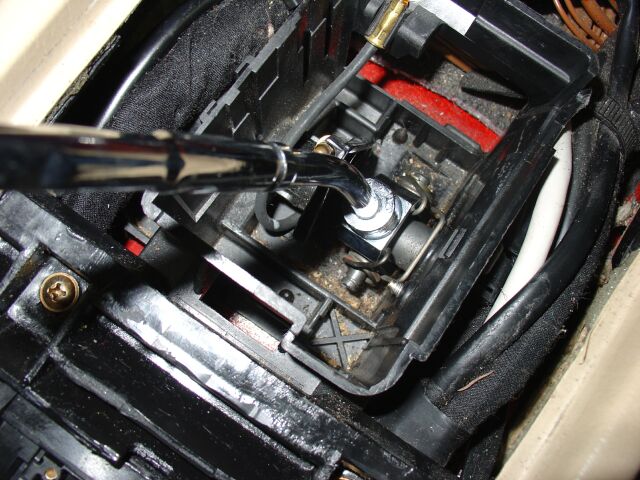
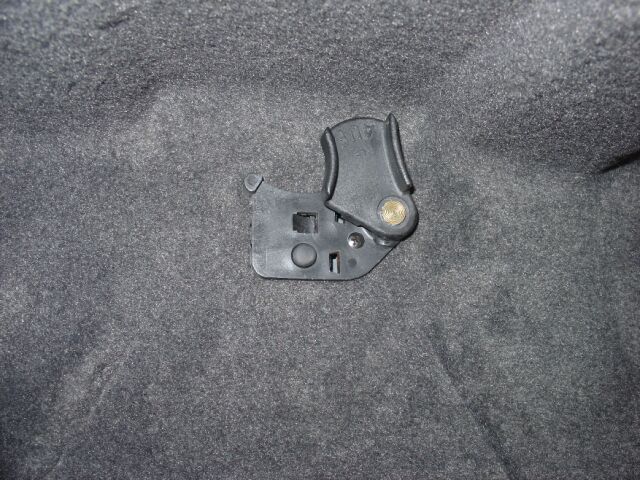
 Next,
the shifter trim needs to be removed, if you look at it, you will see tabs on
the front and the rear that need to be depressed, once you do this, the trim
will come up. You don't have much maneuvering room, so its best to move
the trim (like shown) so you have access to the bottom of the shifter rod and C
clip.
Next,
the shifter trim needs to be removed, if you look at it, you will see tabs on
the front and the rear that need to be depressed, once you do this, the trim
will come up. You don't have much maneuvering room, so its best to move
the trim (like shown) so you have access to the bottom of the shifter rod and C
clip.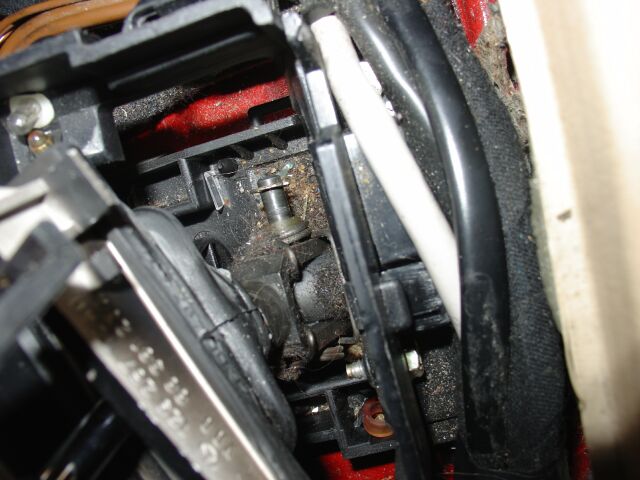
There is a gold colored C clip that holds the shifter rod pin in place. Using a needle nose pliers, remove this clip (don't loose it) and then you will be able to slide the pin out. Also, there are some bushings on both ends of the pin (you can see one in this picture that popped out) make sure you don't loose these. Also see http://www.2phast.com/500e/techdocs/124_shift_knob.pdf for a Japanese PDF on the same procedure.
 Here
you can see the bottom of the shifter assembly and the pin, spring and bushings.
Remember how the spring is installed before you take it off, its an important
part of the assembly.
Here
you can see the bottom of the shifter assembly and the pin, spring and bushings.
Remember how the spring is installed before you take it off, its an important
part of the assembly. 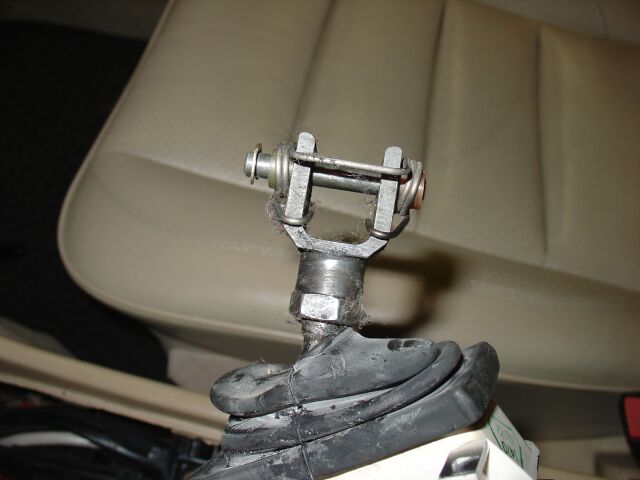
Another picture of the assembly and spring. You need to remove the U shaped mount so you can slide it out of the boot. You need a pair of pliers and a 14 mm open end wrench to loosen the nut, then you can unscrew the U bracket and nut.
 The
inside of the shifter box with the lever removed. Now is a good time to
clean it out and replace any bulbs that may be burned out.
The
inside of the shifter box with the lever removed. Now is a good time to
clean it out and replace any bulbs that may be burned out.
The W202 shift rod compared to the stock W124 shift knob/shaft
 So
remembering how the spring mounts and not forgetting the two bushings, you can
place the W202 shift rod over the mount holes and slide the pin in place.
Because of the pressure on the spring, its not easy to get the bushings into
place, use a small flat blade screw driver to move the spring a bit so the
bushings slide in. Once the pin is fully seated, you can replace the C
clip (using your needle nose pliers)
So
remembering how the spring mounts and not forgetting the two bushings, you can
place the W202 shift rod over the mount holes and slide the pin in place.
Because of the pressure on the spring, its not easy to get the bushings into
place, use a small flat blade screw driver to move the spring a bit so the
bushings slide in. Once the pin is fully seated, you can replace the C
clip (using your needle nose pliers) Once
the new shift rod is in place, test its movement and ensure that you managed to
get the spring assembly on correctly and of course, that you didn't mount the
shifter rod backward (refer to your OE knob/rod for proper alignment)
Once
the new shift rod is in place, test its movement and ensure that you managed to
get the spring assembly on correctly and of course, that you didn't mount the
shifter rod backward (refer to your OE knob/rod for proper alignment)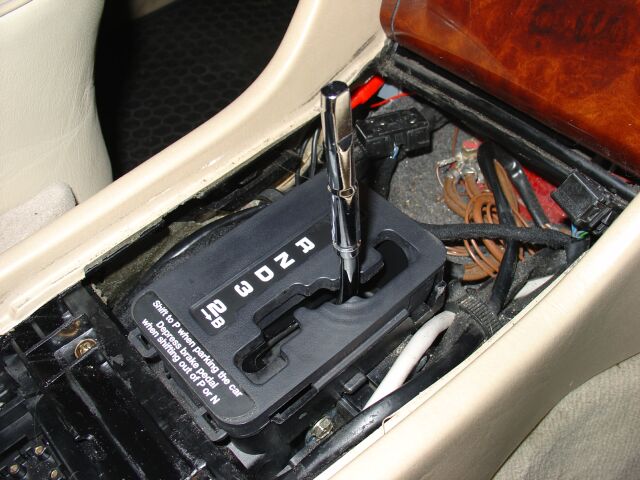 Once
the rod was installed, I re-installed the top shifter plate and all the
associated pieces (including the 1st gear start B switch) and tested the shifter
for proper functionality.
Once
the rod was installed, I re-installed the top shifter plate and all the
associated pieces (including the 1st gear start B switch) and tested the shifter
for proper functionality.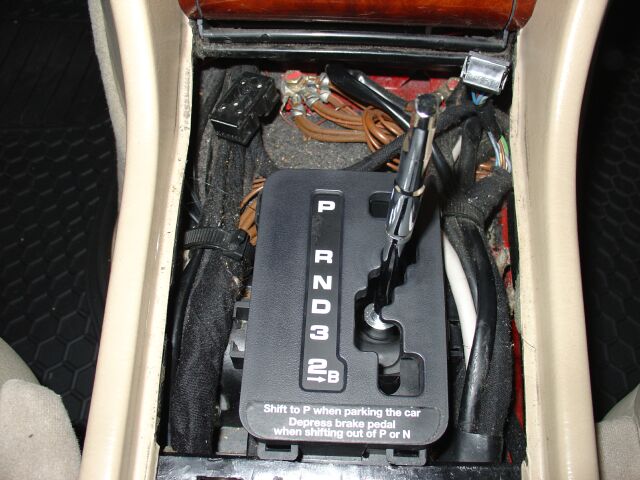 Another
picture of the W202 shift rod installed.
Another
picture of the W202 shift rod installed.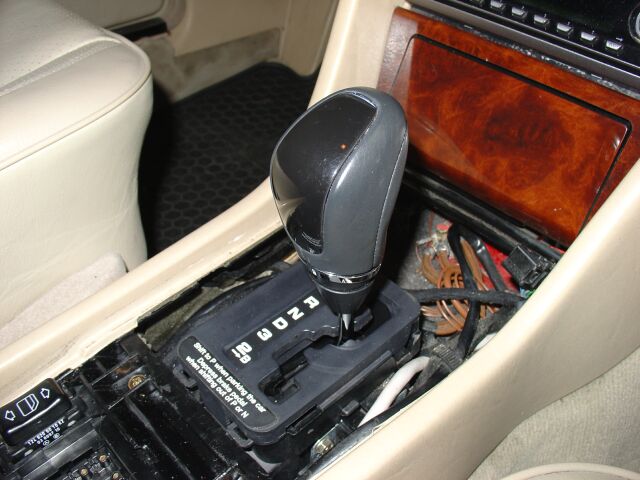 The
W203 shift knob has a twist type base, you twist it to unlock the mount, slide
the knob onto the rod, then twist the base back into alignment, and thus locking
the knob onto the shift rod. The fit was perfect and secure.
The
W203 shift knob has a twist type base, you twist it to unlock the mount, slide
the knob onto the rod, then twist the base back into alignment, and thus locking
the knob onto the shift rod. The fit was perfect and secure.
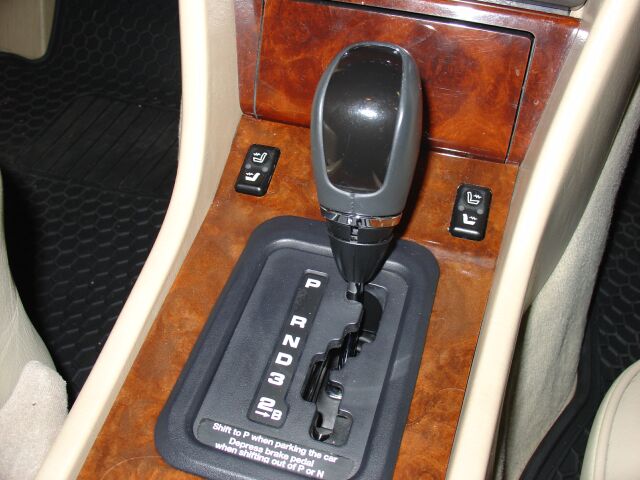
The finished product. A nice update to your interior which easily allows you to change knobs as you see fit without the hassle of taking apart the entire console.
 Another
side view of the knob install.
Another
side view of the knob install.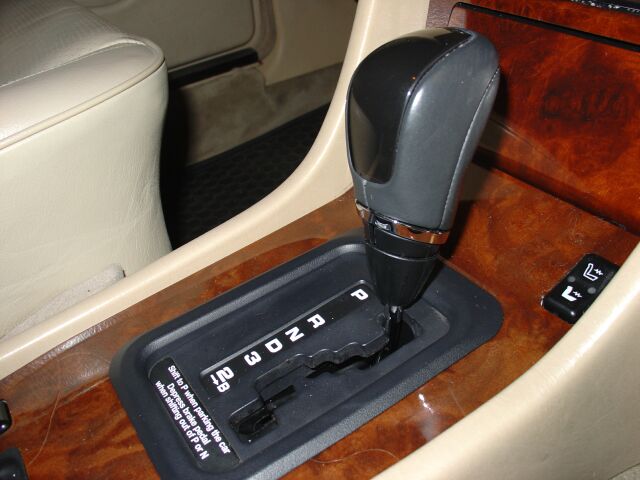 One
last view of the knob install. The W202 rod, keeps the knob close to the
shifter gate through all the gears.
One
last view of the knob install. The W202 rod, keeps the knob close to the
shifter gate through all the gears.6/7/10 - W210 Shift knob installation
So
the W203 shift knob is just fine, but I managed to locate a W210 E Class
knob (w/Mercedes Star emblem) for a mere $21 on Ebay. I like this
design better than the W203 knob, so decided to switch.
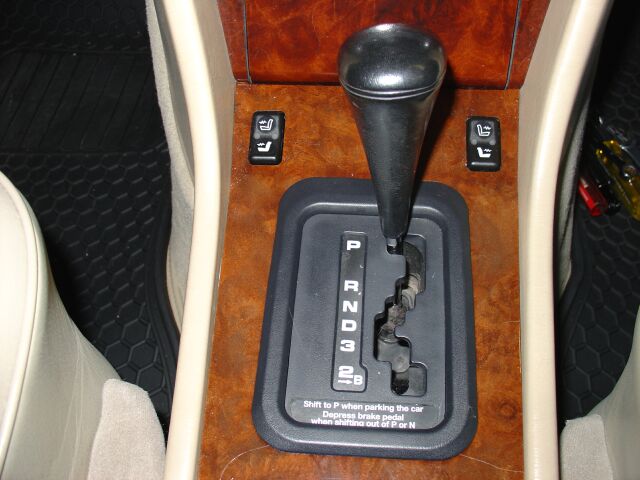
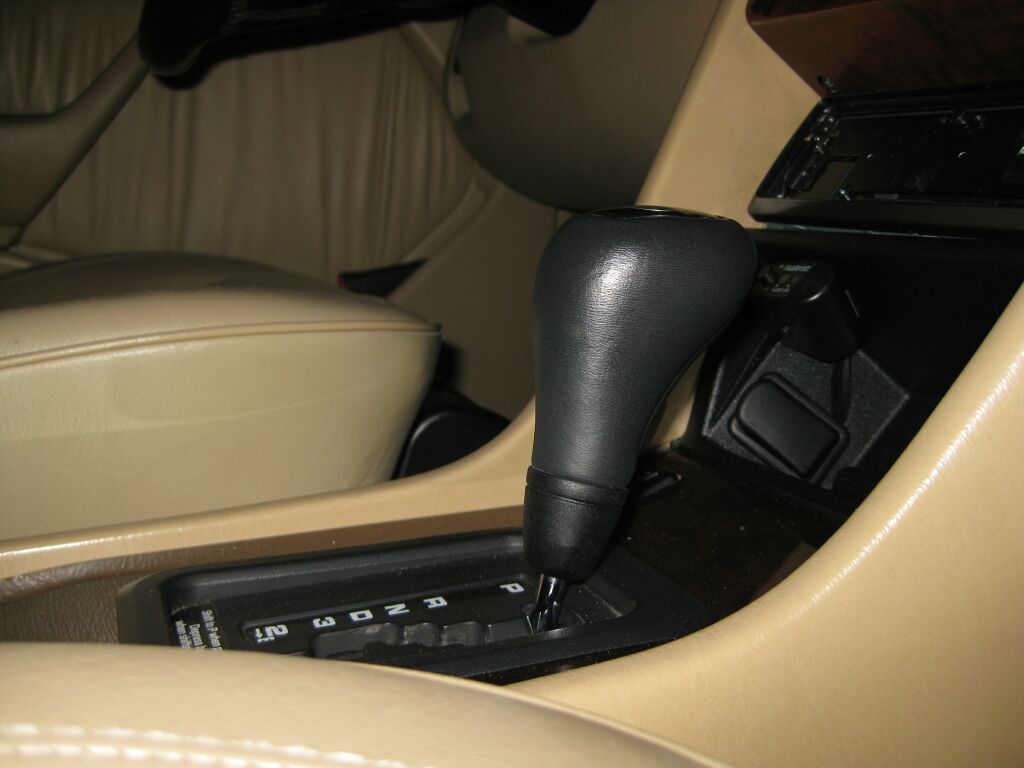 Side
profile view of the W210 knob. As with the other knob, the base
twists, then the knob is inserted onto the shaft and you twist the base
again to lock it in place. Unlike the W203 knob, the base of this one
does not actually come off.
Side
profile view of the W210 knob. As with the other knob, the base
twists, then the knob is inserted onto the shaft and you twist the base
again to lock it in place. Unlike the W203 knob, the base of this one
does not actually come off.
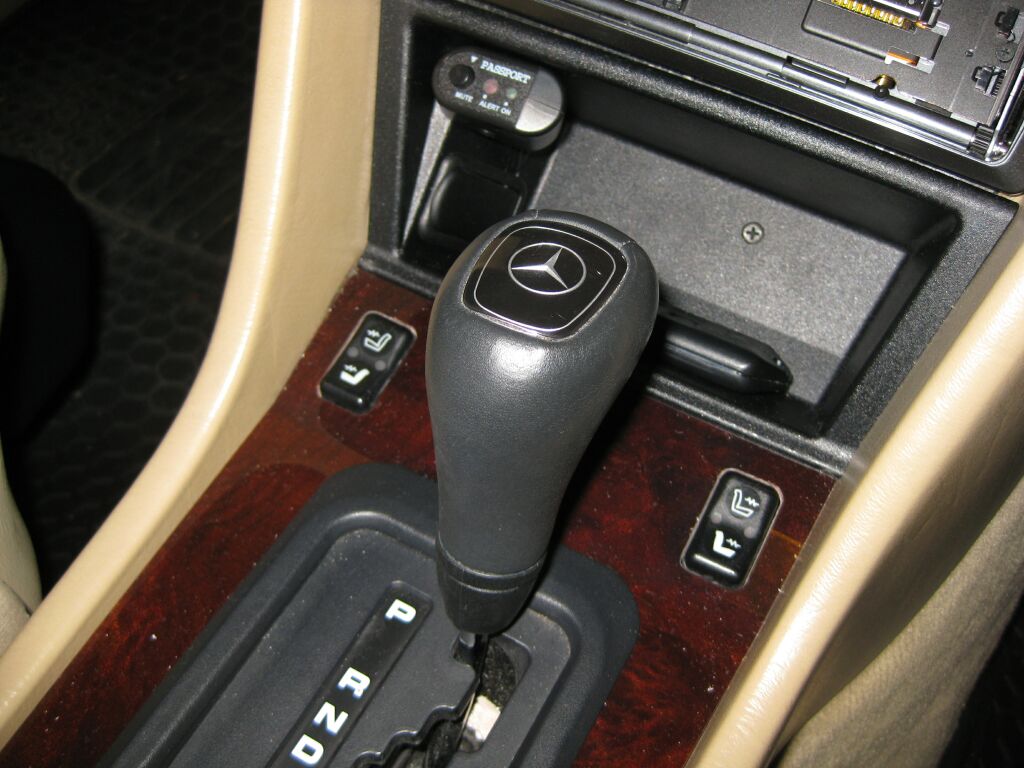 Upper
view showing the MB star emblem. Hopefully, one day I can locate a
G500 emblem (which has the MB star and V8 logo) and make the swap.
Upper
view showing the MB star emblem. Hopefully, one day I can locate a
G500 emblem (which has the MB star and V8 logo) and make the swap.
8-19-10 -
G500 V8 Shift Knob Install
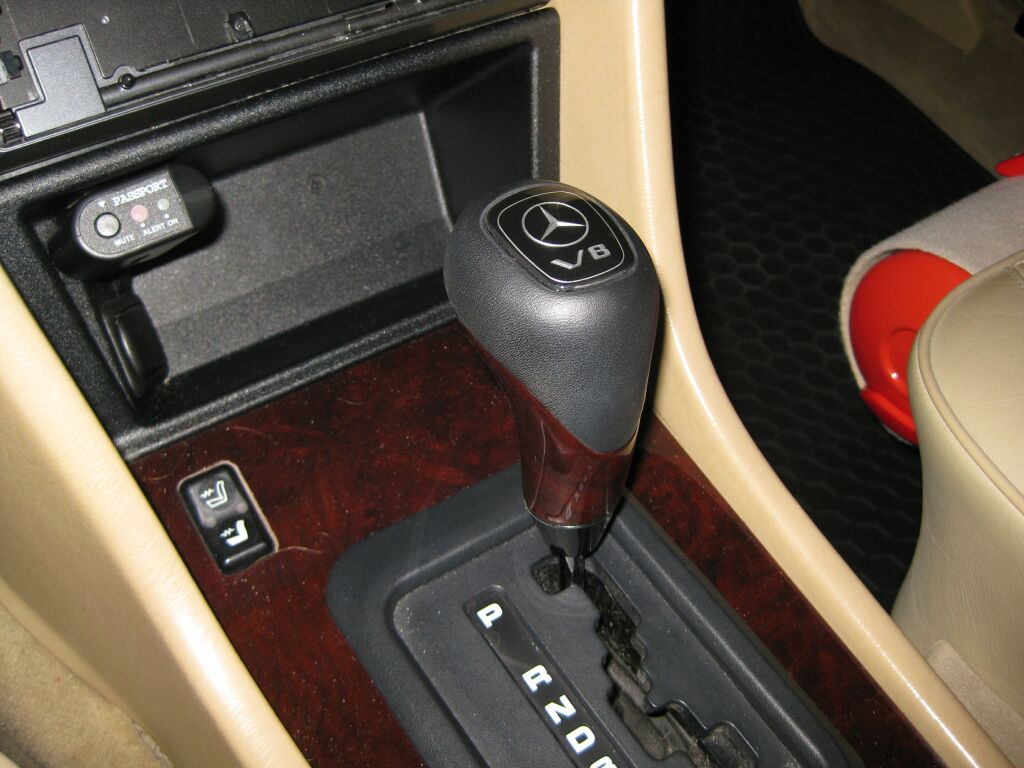 I
originally wanted a G500 V8 shift knob, but could never locate one.
Just my luck, found one on Ebay not too long after installing the W210 knob.
This knob was only available on the G500 and is black leather and burl,
which match's the 500e wood.
I
originally wanted a G500 V8 shift knob, but could never locate one.
Just my luck, found one on Ebay not too long after installing the W210 knob.
This knob was only available on the G500 and is black leather and burl,
which match's the 500e wood.
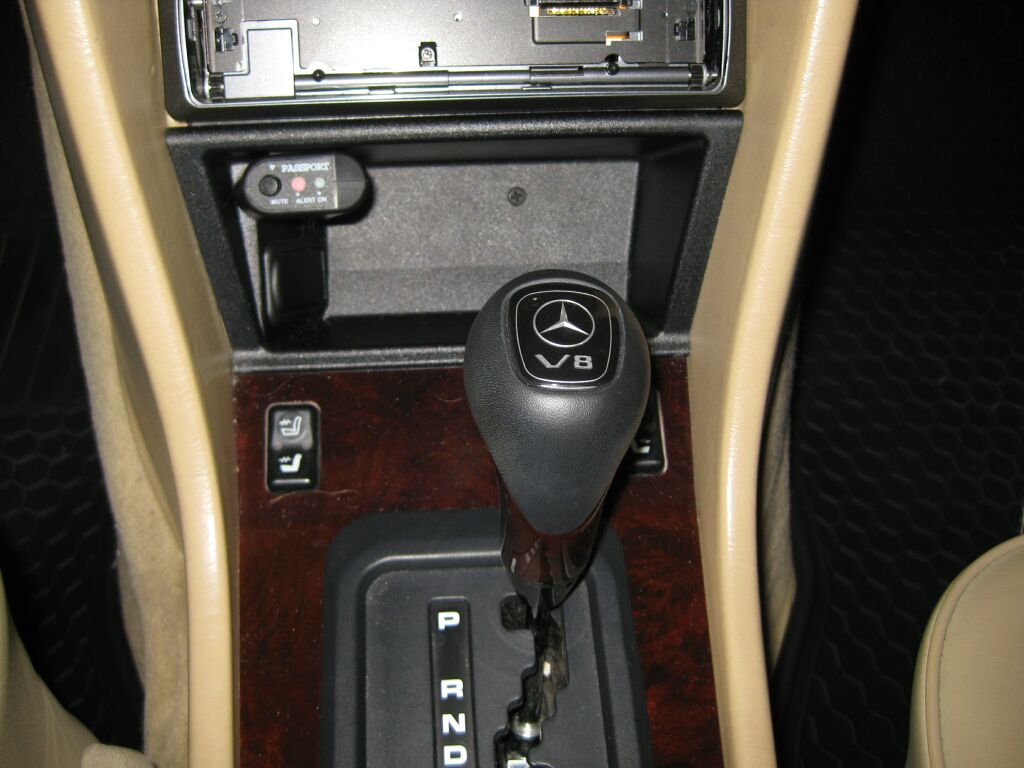
The
condition of this knob is "like new" and its another great Ebay find for a
mere $80. You can order these from the dealer, but the cost is over
$400. I also found out that you can not order just the V8 emblem by
itself.
 Having
a W202/R129 shift shaft makes swapping knobs so very easy. If you have
not upgraded to this newer style shaft, I highly recommend you do so.
Having
a W202/R129 shift shaft makes swapping knobs so very easy. If you have
not upgraded to this newer style shaft, I highly recommend you do so.
4-1-06 - SLK Pedal install
 First,
don't get suckered into purchasing these from Ebay, directly from the dealer
they are about $45.00 vs. the $90 some criminals are charging on Ebay. For
a W124 you need part numbers, 170-300-00-04, 170-290-01-82, 203-430-00-84
First,
don't get suckered into purchasing these from Ebay, directly from the dealer
they are about $45.00 vs. the $90 some criminals are charging on Ebay. For
a W124 you need part numbers, 170-300-00-04, 170-290-01-82, 203-430-00-84
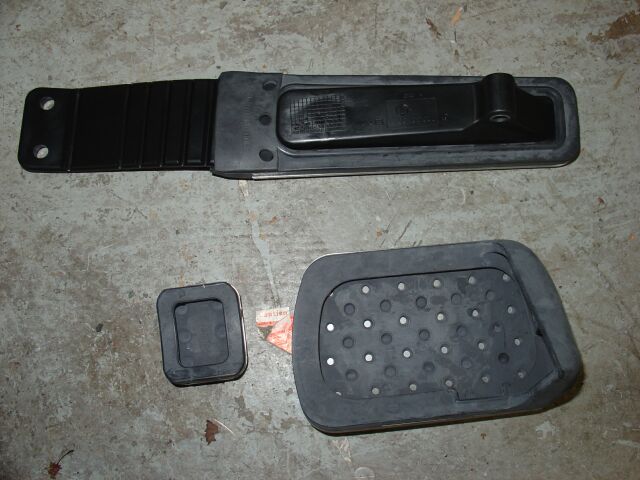
You can see that the parking brake and brake are going to be easy slip on items.
The accelerator is a different story, as its completely
different from the W124 accelerator.
 First
you need to remove your floor mats and the underlying carpet. You can then
easily pop off the parking brake and brake covers
First
you need to remove your floor mats and the underlying carpet. You can then
easily pop off the parking brake and brake covers

The parking brake pedal is by far the easiest to install and only took a few
minutes.
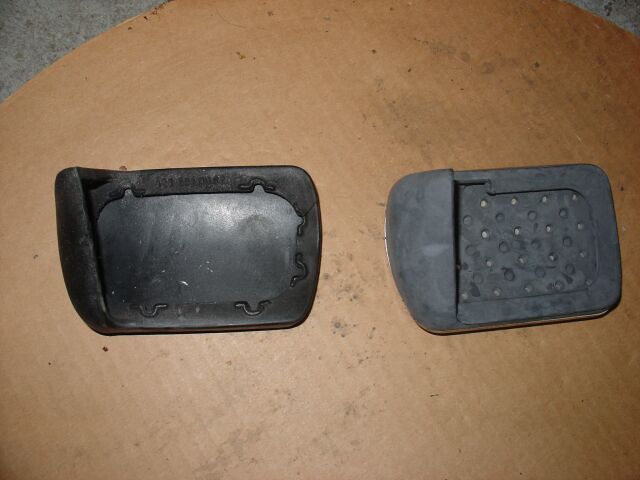 The
brake pedal pad is virtually identical to the W124 pad in design.
The
brake pedal pad is virtually identical to the W124 pad in design.

The brake pedal is not quite as easy to install. I used a small wide flat
blade screw driver to help get the lip of the new pedal cover on.
Its
probably best to start with upper right corner already on, then work your way
down and around, using the screw driver to help pull out and stretch the lip.
 The
accelerator was the most difficult part of this install. You need to
remove the pedal first, so pull out the small silver clip at the
bottom, then
slide the bottom of the pedal to the left and you should be able to release it
from the accelerator shaft, just be careful and don't force it. So we
first remove the SLK pedal cover from the SLK pedal assembly.
The
accelerator was the most difficult part of this install. You need to
remove the pedal first, so pull out the small silver clip at the
bottom, then
slide the bottom of the pedal to the left and you should be able to release it
from the accelerator shaft, just be careful and don't force it. So we
first remove the SLK pedal cover from the SLK pedal assembly.
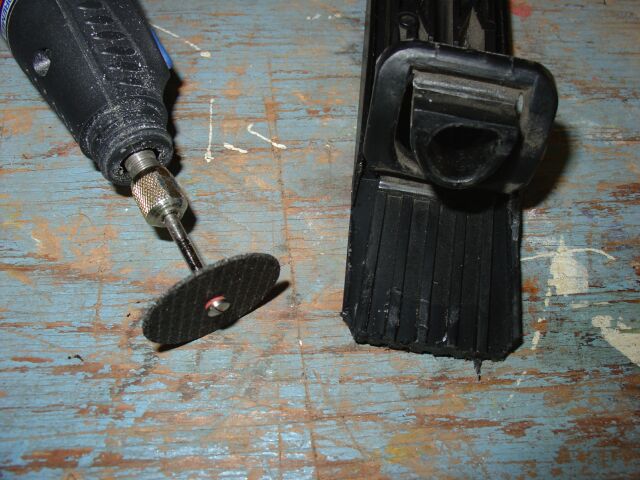
If you want the SLK pedal cover to sit correctly on the W124 pedal assembly,
some trimming of both the pedal cover and assembly are
required. Your Dremel will come in handy here. I wanted the SLK
cover to sit exactly the same as the OE rubber cover, so that
required a bit of trimming of the top of the assembly.
 There
really is no way to get the SLK cover on the OE W124 pedal assembly without
making a slice in this flat wide piece of the pedal cover.
There
really is no way to get the SLK cover on the OE W124 pedal assembly without
making a slice in this flat wide piece of the pedal cover.

With pedal cover sliced, you can easily slide it down onto the OE pedal
assembly. You might want to trim just a little bit at a time off the
pedal
assembly and just keep refitting the pedal cover till you get it sitting where
you want.
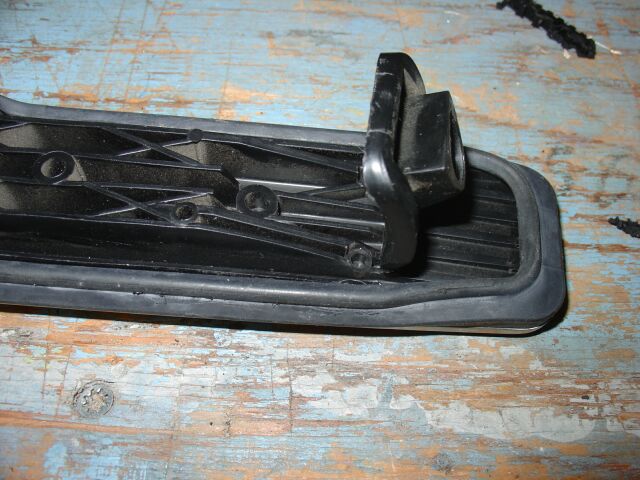 You
can see that the sides of the OE pedal assembly are a bit taller than the SLK
pedal assembly. Again, its time to break out the Dremel and get to
trimming.
You
can see that the sides of the OE pedal assembly are a bit taller than the SLK
pedal assembly. Again, its time to break out the Dremel and get to
trimming.

About 1/8" of the side needed to be trimmed down. This allowed the lip of
the SLK pedal cover to better wrap around the OE pedal
assembly.
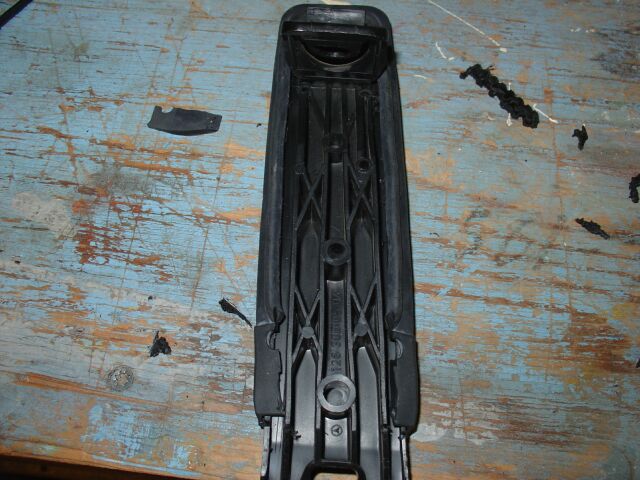 With
the sides of the OE pedal assembly trimmed down and the pedal cover properly
fitted, there was only a little more trimming of the pedal cover to get it to
sit correctly and wrap.
With
the sides of the OE pedal assembly trimmed down and the pedal cover properly
fitted, there was only a little more trimming of the pedal cover to get it to
sit correctly and wrap.

There is a lip near the bottom of the OE pedal assembly, this is where the OE
rubber pedal cover rested. So when I starting trimming for the SLK pedal
cover, I made sure it would rest on the same lip.
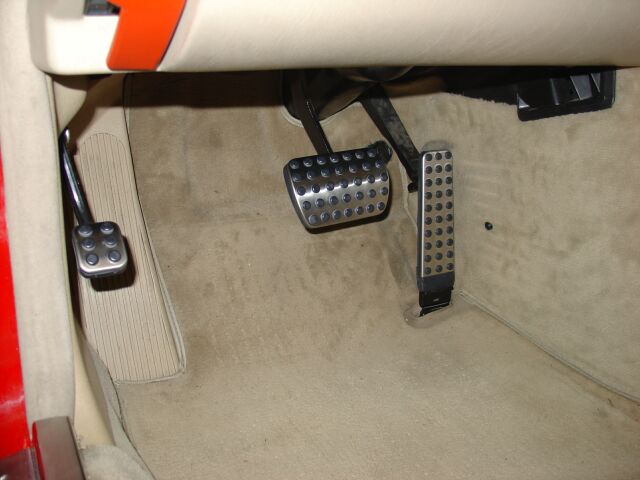 And
the final product.
And
the final product.
04-01-06 - B Pillar replacements.
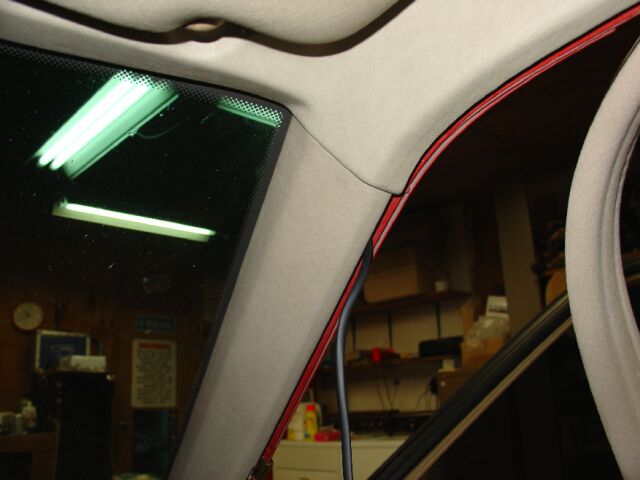
 One
of the few interior flaws on my vehicle were the B pillar covers, the material
was torn away in some places and peeling in others. The MB dealer is
insane with what they want for these pieces (upwards of $800) but thanks to
Livin_it_up at 190rev, my problems are over.
One
of the few interior flaws on my vehicle were the B pillar covers, the material
was torn away in some places and peeling in others. The MB dealer is
insane with what they want for these pieces (upwards of $800) but thanks to
Livin_it_up at 190rev, my problems are over.

To remove these, you need to remove the seat belt and the bottom trim cover of
the B Pillar, you need to be careful removing the top clip of the B
Pillar cover, its best to use a flat blade screw driver to help pop the clip
loose.
 The
old cover vs. the new cover (actually not new, but in almost perfect condition)
The
old cover vs. the new cover (actually not new, but in almost perfect condition)
Auto Dimming Rear View Mirror
 Keeping
with the update theme, I decided to implement an upgrade originally performed on
my W201. Our older car don't have auto dimming mirrors or Homelink built
into them. I have designed a method of integrating a newer style auto
dimming mirror onto a factory Mercedes Benz stalk. This new mirror
includes not only auto dimming, but Homelink and a compass. The mirror also
replicates the OEM look. All wiring is internal to the stalk. Ever
since I developed this upgrade back in 2000, many people have used my
information to build their own auto dimming mirror. But there has been a large portion of the
Mercedes community asking me to build mirrors for their vehicles. Starting
in 2007, I starting providing mirrors on a custom order basis. There
is now a dedicated web site just for this purpose and the link is below.
Keeping
with the update theme, I decided to implement an upgrade originally performed on
my W201. Our older car don't have auto dimming mirrors or Homelink built
into them. I have designed a method of integrating a newer style auto
dimming mirror onto a factory Mercedes Benz stalk. This new mirror
includes not only auto dimming, but Homelink and a compass. The mirror also
replicates the OEM look. All wiring is internal to the stalk. Ever
since I developed this upgrade back in 2000, many people have used my
information to build their own auto dimming mirror. But there has been a large portion of the
Mercedes community asking me to build mirrors for their vehicles. Starting
in 2007, I starting providing mirrors on a custom order basis. There
is now a dedicated web site just for this purpose and the link is below.
Illuminated Door Sills
 These
door sills have an aluminum finish and light up when you open the door (only the
fronts). These were on the 500E when I bought it, not sure if I really
like them or not.
These
door sills have an aluminum finish and light up when you open the door (only the
fronts). These were on the 500E when I bought it, not sure if I really
like them or not.
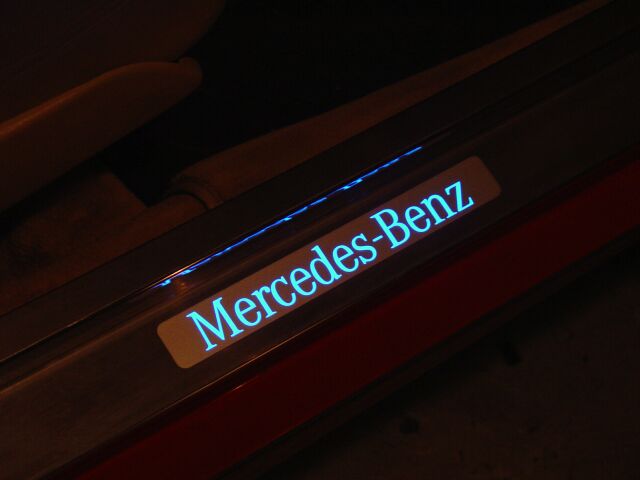 This
is what they look like at night. The install appears to be pretty straight
forward, two wires, one to +12 and the other connects to the door pin ckt so
they illuminate when you open the door only.
This
is what they look like at night. The install appears to be pretty straight
forward, two wires, one to +12 and the other connects to the door pin ckt so
they illuminate when you open the door only.
Euro
Trunk Warning Triangle
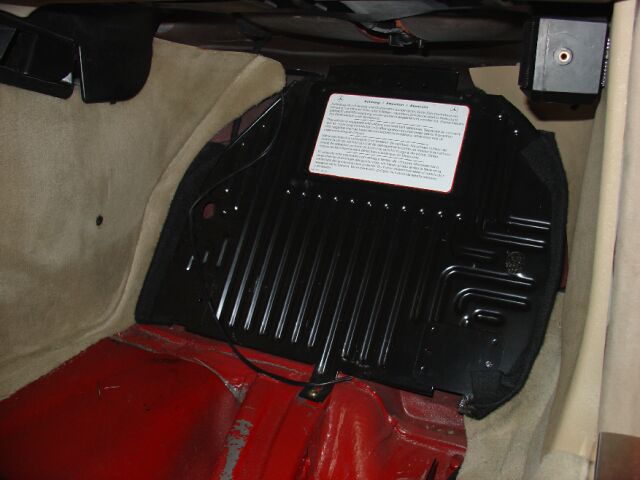
 The
W124's have this nice molded carpet that covers the inner trunk lid and as you
can see, there is an outline for the trunk mounted warning triangle that is
found in the euro models. Installation of this triangle is not overly
complex but if you want to make the install look nice and professional, you need
to exercise some judgment when you start cutting holes in your trunk carpet.
The
W124's have this nice molded carpet that covers the inner trunk lid and as you
can see, there is an outline for the trunk mounted warning triangle that is
found in the euro models. Installation of this triangle is not overly
complex but if you want to make the install look nice and professional, you need
to exercise some judgment when you start cutting holes in your trunk carpet.
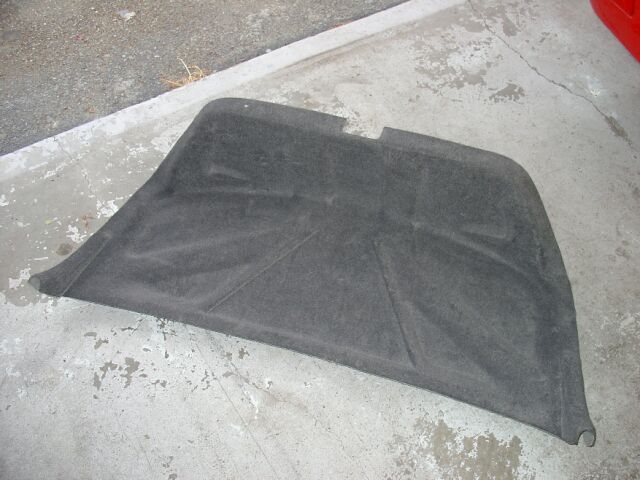
The
first thing to do here is remove the carpet from the trunk. Be careful and
take your time, otherwise you can break the clips and/or lose them in the
procedure.
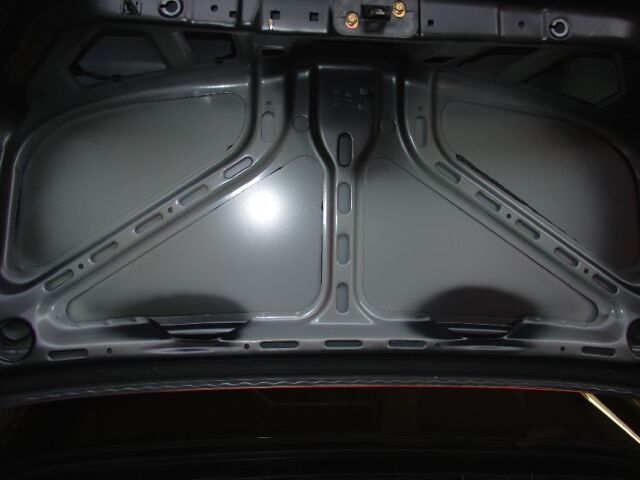 Once
the trunk carpet is off, you can see where the triangle bracket mounts and where
the feet of the triangle sit, these areas should be readily visible as Mercedes
painted these areas black but not the majority of the trunk lid.
Once
the trunk carpet is off, you can see where the triangle bracket mounts and where
the feet of the triangle sit, these areas should be readily visible as Mercedes
painted these areas black but not the majority of the trunk lid.

To determine the correct spot to cut into the carpet (for the triangle
bracket) I first removed all the clips from the trunk carpet piece, then I used
some black touch up paint to paint around each hole as shown here in the
picture.
 I
then re-installed the trunk carpet and applied pressure at the top where the
triangle bracket goes. Once removed, you can see a faint outline of where
the triangle bracket clips go. This was my starting place to start
cutting. The bracket will not sit correctly if you just cut out the holes
as shown, you actually need to cut out a large chunk of the carpet for the
bracket rests against the trunk lid metal.
I
then re-installed the trunk carpet and applied pressure at the top where the
triangle bracket goes. Once removed, you can see a faint outline of where
the triangle bracket clips go. This was my starting place to start
cutting. The bracket will not sit correctly if you just cut out the holes
as shown, you actually need to cut out a large chunk of the carpet for the
bracket rests against the trunk lid metal.
 Once
I had the first set of guide holes cut out, I was able to place the bracket and
out line it with some tape. This allowed me to cut out enough of the
carpet to allow the bracket to sit flush against the metal with out having any
metal show around the edges of the bracket.
Once
I had the first set of guide holes cut out, I was able to place the bracket and
out line it with some tape. This allowed me to cut out enough of the
carpet to allow the bracket to sit flush against the metal with out having any
metal show around the edges of the bracket.
 To
cut the holes for the triangle feet, I placed the triangle in the molded recess
and market the position of the fee with tape to give me a pattern of where and
how much material to cut. I cut two almost identical rectangles.
To
cut the holes for the triangle feet, I placed the triangle in the molded recess
and market the position of the fee with tape to give me a pattern of where and
how much material to cut. I cut two almost identical rectangles.
 My
trunk bracket came from my W201 and as some of you already know, they don't come
off very easily. Several of my mounting tabs broke off, so I needed to
counter sink a hole for a screw (as seen in the picture) if your using a new
bracket, you won't have any need for the screw. You can also see that the
fit for the bracket is perfect, no metal showing at all!
My
trunk bracket came from my W201 and as some of you already know, they don't come
off very easily. Several of my mounting tabs broke off, so I needed to
counter sink a hole for a screw (as seen in the picture) if your using a new
bracket, you won't have any need for the screw. You can also see that the
fit for the bracket is perfect, no metal showing at all!
 This
is the bracket installed
This
is the bracket installed
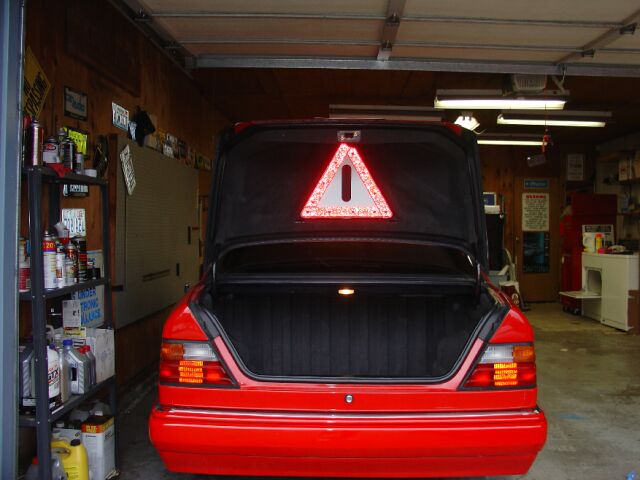 A
distant picture of the trunk and warning triangle
A
distant picture of the trunk and warning triangle
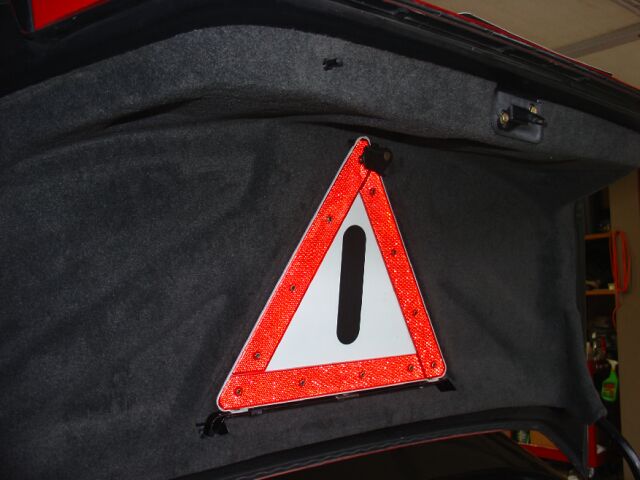
 These
last couple of pictures look much better (no camera flash)
These
last couple of pictures look much better (no camera flash)

The triangles can be purchased from either the US, German or UK Ebay and the
brackets can be ordered through your local MB dealer. The brackets for the
W201 and W124 are the same, I am not sure what other models use this same
bracket.
The part number for the triangle is
140-590-0212 and the part number for the
bracket is 140-890-00-14
6-29-06 - Euro Fire Extinguisher install
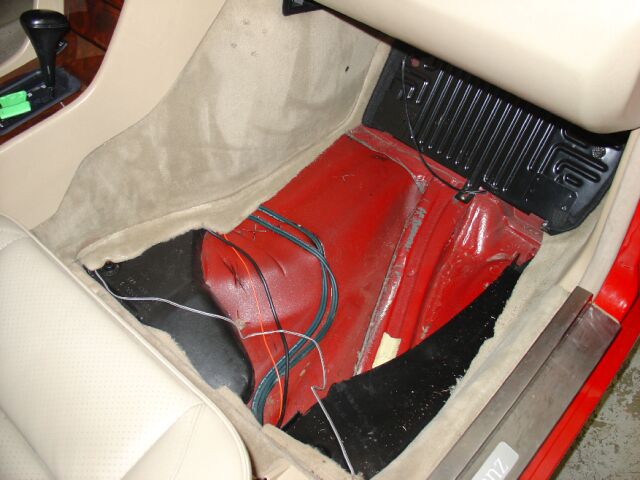
 Another
European only option was the drivers seat mounted fire extinguisher. These
are virtually impossible to get in the US and getting one shipped from Europe to
the US is not a walk in the park either. This is the spot on the drivers
seat where the OE MB bracket will be installed.
Another
European only option was the drivers seat mounted fire extinguisher. These
are virtually impossible to get in the US and getting one shipped from Europe to
the US is not a walk in the park either. This is the spot on the drivers
seat where the OE MB bracket will be installed.
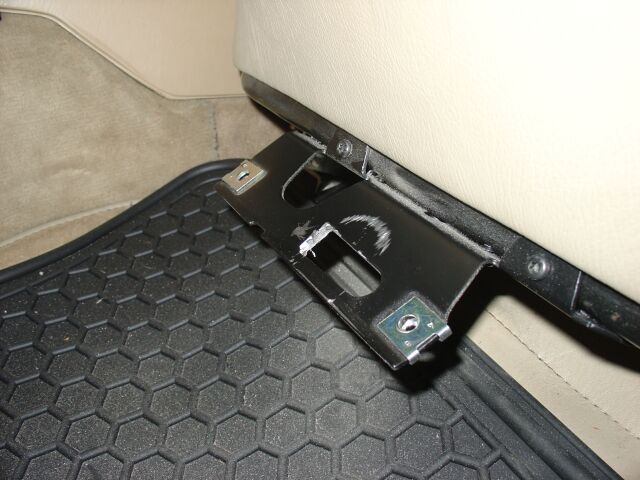
 There
are several recesses on the seat that indicate where you need to drill your
holes. The tips of the tabs need to tuck up under the seat material as
shown in this picture. MB recommends six screws, but four is enough.
The remaining two are on the very bottom and to install them requires taking the
seat out.
There
are several recesses on the seat that indicate where you need to drill your
holes. The tips of the tabs need to tuck up under the seat material as
shown in this picture. MB recommends six screws, but four is enough.
The remaining two are on the very bottom and to install them requires taking the
seat out.
 Here
are two of the star screws installed (two holes already pre-drilled for you),
the other two are on the bottom of the bracket and I can't get good pictures at
that angle. (see additional pictures at end)
Here
are two of the star screws installed (two holes already pre-drilled for you),
the other two are on the bottom of the bracket and I can't get good pictures at
that angle. (see additional pictures at end)
 You
also need two speed clips which go on either end of the mounting bracket.
You
also need two speed clips which go on either end of the mounting bracket.
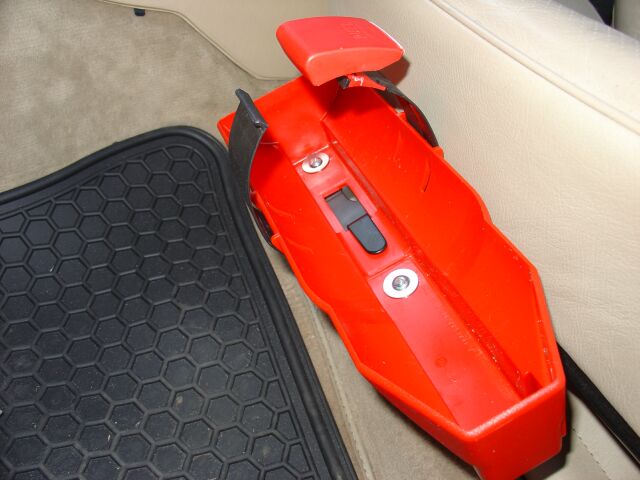 This
is the bucket that comes with the 1 kg Gloria Fire Extinguisher (some appear to
come in red and some in black), it slides onto the bracket clip and then secures
with two screws and two washers.
This
is the bucket that comes with the 1 kg Gloria Fire Extinguisher (some appear to
come in red and some in black), it slides onto the bracket clip and then secures
with two screws and two washers.
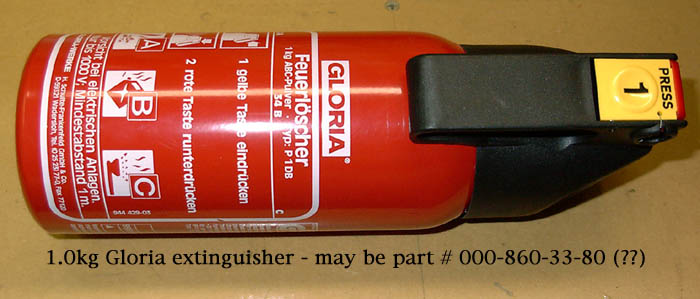
 This
is the 1 kg Gloria. Older MB came with a 1.3 kg Gloria and those also had
a interior matching carpet cover.
This
is the 1 kg Gloria. Older MB came with a 1.3 kg Gloria and those also had
a interior matching carpet cover.
 Here
is the Gloria mounted.
Here
is the Gloria mounted.
6/15/09 - New 1.3kg Fire extinguisher
installed

 Here
you can see the 1.3kg Gloria on the left and the smaller W210 1.0kg on the
right. Either of these is fine to have in your car, but I prefer the
factory extinguisher with the carpet cover.
Here
you can see the 1.3kg Gloria on the left and the smaller W210 1.0kg on the
right. Either of these is fine to have in your car, but I prefer the
factory extinguisher with the carpet cover.
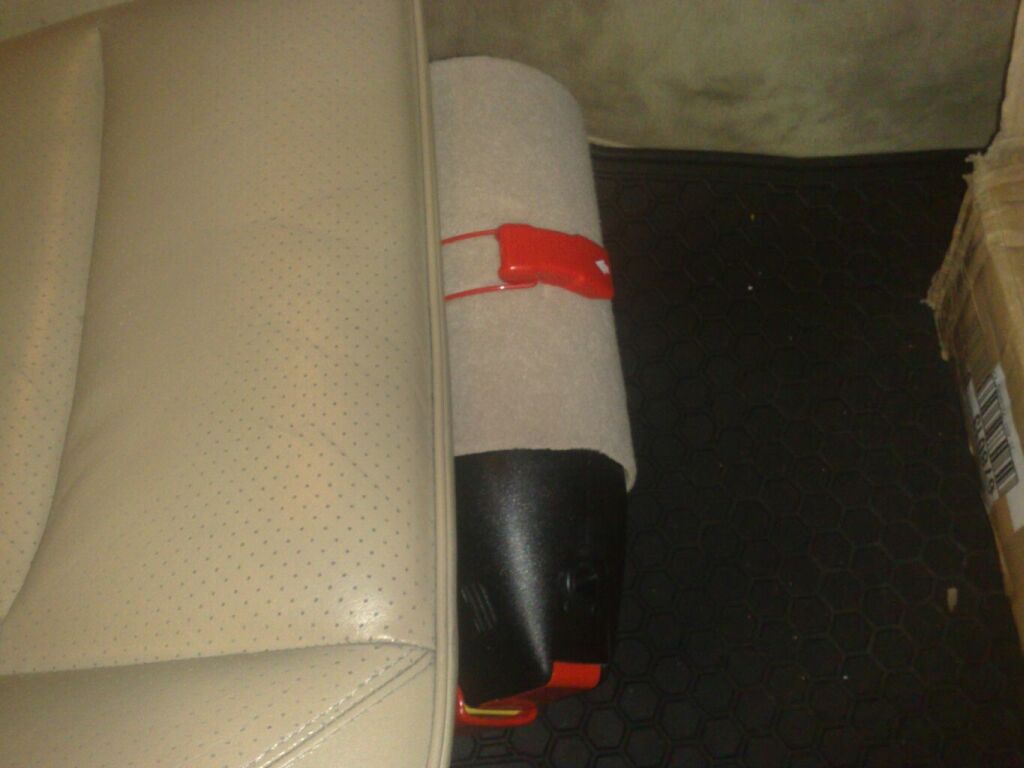 This
is the new extinguisher installed. In case you have not noticed, its
on the passenger seat, the oddments box resides on the drivers seat.
This
is the new extinguisher installed. In case you have not noticed, its
on the passenger seat, the oddments box resides on the drivers seat.
The following pictures show the
individual parts. Special thanks for Dave Meimann for putting together the
pictures/part numbers.
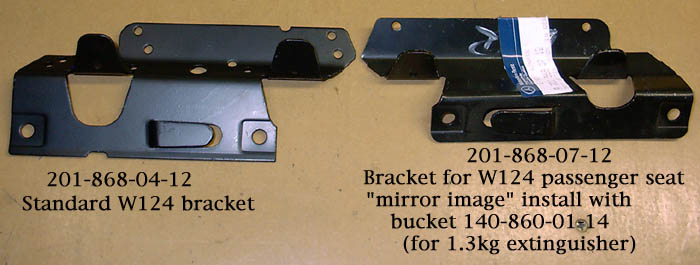 Left
and right brackets and part numbers
Left
and right brackets and part numbers
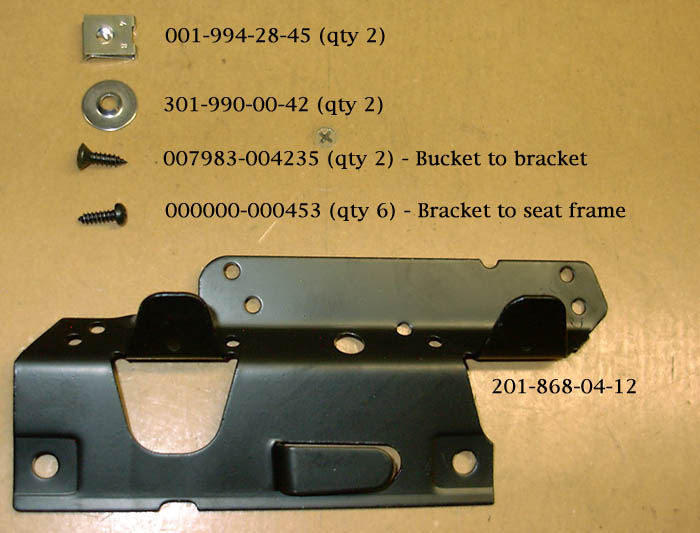 To
mount the fire extinguisher on your drivers seat, these are all the parts you
need, minus of course the actual fire extinguisher.
To
mount the fire extinguisher on your drivers seat, these are all the parts you
need, minus of course the actual fire extinguisher.
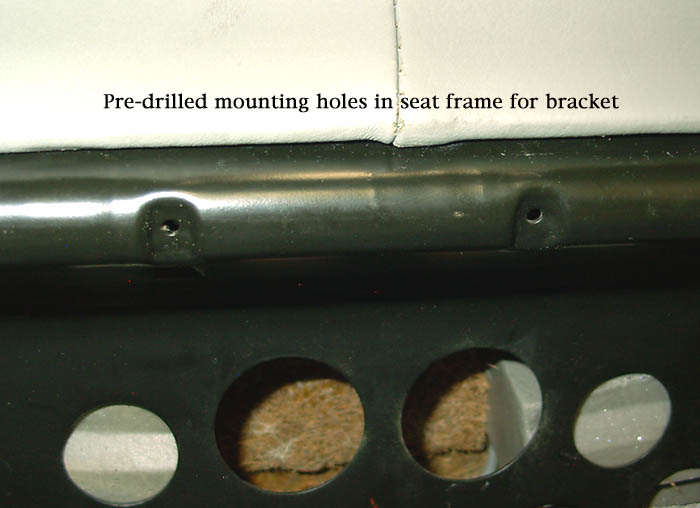 These
are the two pre-drilled holes. I have been told that not all W124's have
pre-drilled holes, but the indents should be there.
These
are the two pre-drilled holes. I have been told that not all W124's have
pre-drilled holes, but the indents should be there.
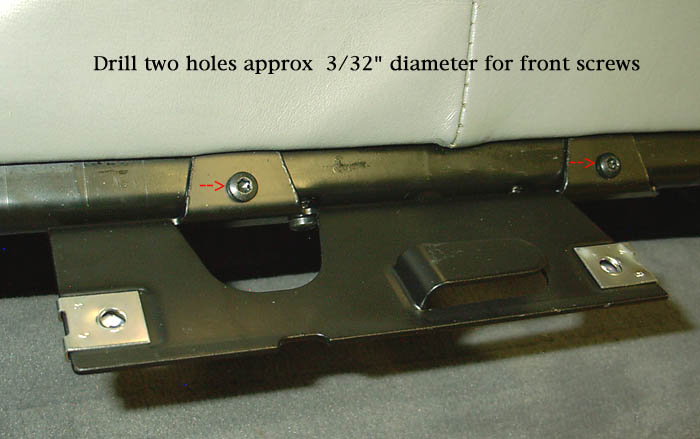 The
bracket, clips and two screws installed.
The
bracket, clips and two screws installed.
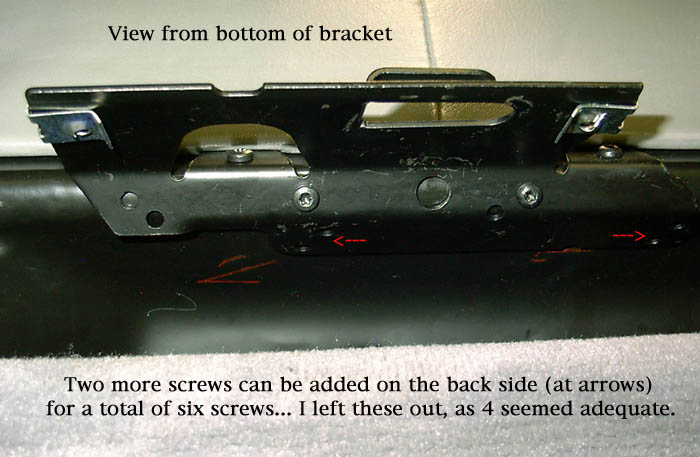 The
bottom two screws installed.
The
bottom two screws installed.
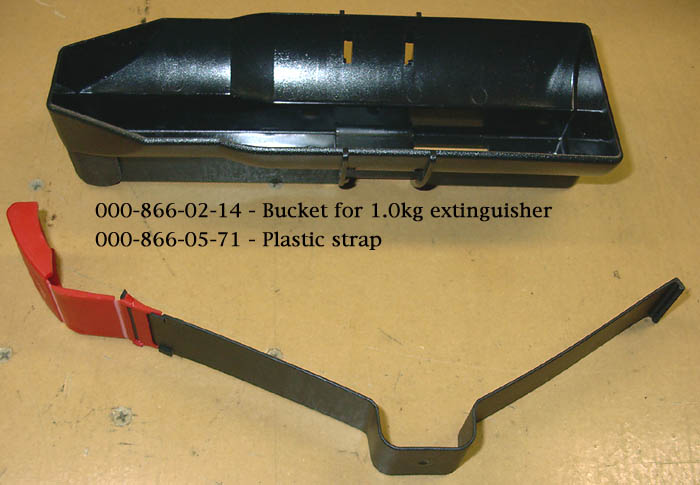 This
is the bucket and strap as supplied by MB. As you can see from my
pictures, my bucket is identical and is red.
This
is the bucket and strap as supplied by MB. As you can see from my
pictures, my bucket is identical and is red.
 The
1 kg Gloria with MB part number.
Gloria Fire
Extinguisher specifications PDF
The
1 kg Gloria with MB part number.
Gloria Fire
Extinguisher specifications PDF
Euro Oddments box installation
9-21-06
 Another rare option for the W124/W201 is the Oddment box, a plastic storage
box that mounts just like the extinguisher does. You need a correct
bracket (A1248680212) which does not have the extinguisher tab, or, if you
already have a extinguisher bracket, you can just cut the tab off like I did
(see following pictures). This item is located under SA 56152 in the EPC,
its is not searchable directly by its part number.
Another rare option for the W124/W201 is the Oddment box, a plastic storage
box that mounts just like the extinguisher does. You need a correct
bracket (A1248680212) which does not have the extinguisher tab, or, if you
already have a extinguisher bracket, you can just cut the tab off like I did
(see following pictures). This item is located under SA 56152 in the EPC,
its is not searchable directly by its part number.
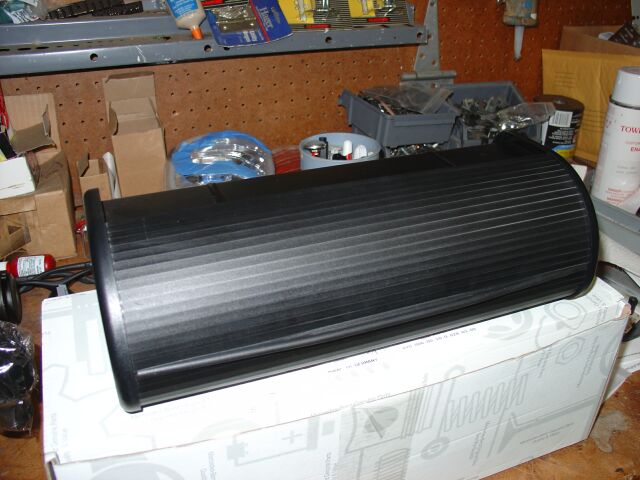 This
is what the Oddments box looks like, it has a roll top door, which needs some
greasing so it moves smoothly.
This
is what the Oddments box looks like, it has a roll top door, which needs some
greasing so it moves smoothly.
 I
chose to install the Oddments box on the drivers seat and move the extinguisher
to the passenger seat, which meant I needed to order a passenger seat bracket
and all the accessories (see extinguisher install above for part numbers) and
since I already had a drivers seat bracket, I elected to just cut the tab off so
the Oddments box will sit flush.
I
chose to install the Oddments box on the drivers seat and move the extinguisher
to the passenger seat, which meant I needed to order a passenger seat bracket
and all the accessories (see extinguisher install above for part numbers) and
since I already had a drivers seat bracket, I elected to just cut the tab off so
the Oddments box will sit flush.
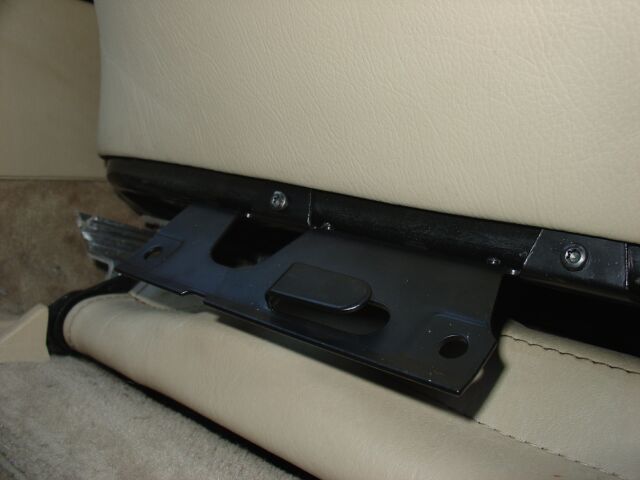
 The
Oddments box installs like the extinguisher using the same type of hardware.
The
Oddments box installs like the extinguisher using the same type of hardware.
 If
your local MB dealer can not order this item, you can try contacting
http://speed-autoteile.com and inquire with them, that is where mine came from.
If
your local MB dealer can not order this item, you can try contacting
http://speed-autoteile.com and inquire with them, that is where mine came from.
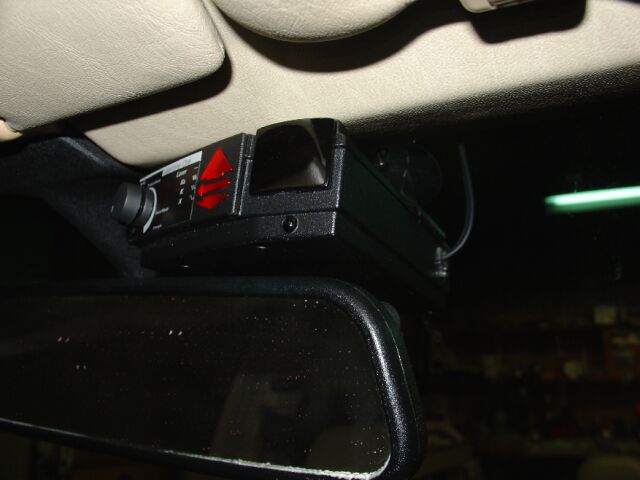
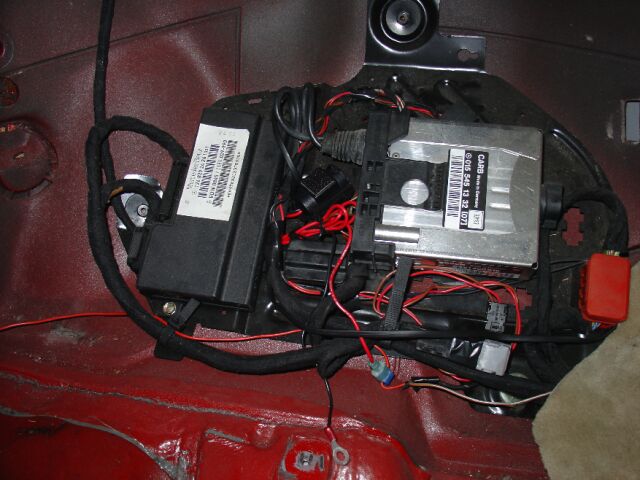
Valentine 1 Radar Detector Install


<Back
Information/pictures on this site are the property of Rik Johnson and are not
to be used without written permission.